Category Archives: Home

Mahindra XUV 3XO: Features, Pricing, and Launch Details of the New Compact SUV

महिंद्रा XUV 3XO: एक नज़र

महिंद्रा ने अपनी नई कॉम्पैक्ट SUV, XUV 3XO, को लॉन्च कर दिया है। Mahindra XUV 3XO: Features, Pricing यह वाहन 26 मई 2024 से डिलीवरी के लिए उपलब्ध होगा। महिंद्रा XUV 3XO की कीमत Rs. 7.49 लाख से शुरू होती है और इसका टॉप वैरिएंट Rs. 13.99 लाख तक जाता है। इस SUV को नए ज़माने की तकनीक और फीचर्स से लैस किया गया है, जो इसे कॉम्पैक्ट SUV सेगमेंट में एक प्रमुख विकल्प बनाते हैं। इसके प्रमुख फीचर्स के बारे में जानना इसे और भी आकर्षक बनाता है।

महिंद्रा XUV 3XO की कीमत

महिंद्रा XUV 3XO के कुल 9 वैरिएंट लॉन्च हुए हैं। बेस मॉडल की कीमत Rs. 7.49 लाख है, जबकि टॉप वैरिएंट का मूल्य Rs. 13.99 लाख है। महिंद्रा के इस नए मॉडल के पावरट्रेन और पावर आउटपुट की भी जानकारी यहाँ दी गई है:

PowertrainPower Output
1.2-लीटर पेट्रोल109bhp/200Nm
1.2-लीटर टर्बो-पेट्रोल129bhp/230Nm
1.5-लीटर डीजल115bhp/300Nm

वैरिएंट्स और उनके दाम

  1. MX1 – Rs. 7.49 लाख
  2. MX2 Pro – Rs. 8.99 लाख
  3. MX2 Pro AT – Rs. 9.99 लाख
  4. MX3 – Rs. 9.49 लाख
  5. AX5 – Rs. 10.69 लाख
  6. AX5L MT – Rs. 11.99 लाख
  7. AX5L AT – Rs. 13.49 लाख
  8. AX7 – Rs. 12.49 लाख
  9. AX7L – Rs. 13.99 लाख

महिंद्रा XUV 3XO के टॉप 5 फीचर्स

महिंद्रा XUV 3XO एक देखने में बेहद आकर्षक SUV है, लेकिन सिर्फ डिज़ाइन ही नहीं, इसके फीचर्स भी इसे खास बनाते हैं। इसमें आधुनिक तकनीक के साथ सुरक्षा और सुविधा का खास ध्यान रखा गया है। यहाँ इस SUV के टॉप 5 फीचर्स के बारे में जानकारी दी जा रही है: Mahindra XUV 3XO: Features, Pricing

1. लेवल 2 ADAS

महिंद्रा XUV 3XO में लेवल 2 ADAS (Advanced Driver Assistance Systems) शामिल है। यह एक उन्नत ड्राइविंग असिस्टेंट है जो आपकी ड्राइविंग को न केवल आसान बनाता है, बल्कि सुरक्षित भी बनाता है। इंडिया में यह फीचर अभी कुछ ही टॉप SUV में उपलब्ध है, जैसे कि XUV700 और Tata Safari। अब महिंद्रा ने इस फीचर को अपनी कॉम्पैक्ट SUV में भी पेश किया है। इसमें कई महत्वपूर्ण फीचर्स शामिल हैं:

  • ब्लाइंड स्पॉट डिटेक्शन
  • पार्किंग असिस्टेंट
  • ट्रैफिक सिग्नल रिकग्निशन
  • हाई बीम असिस्टेंट
  • आटोमेटिक इमरजेंसी ब्रेकिंग
  • फारवर्ड कोलिजन वार्निंग
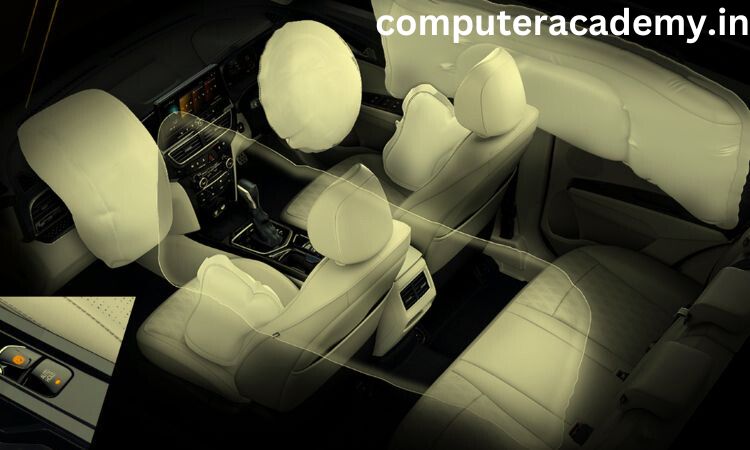
2. 6 एयरबैग्स

महिंद्रा और टाटा दोनों ही भारत के प्रमुख वाहन निर्माता हैं, जो सुरक्षा के मामले में भी अग्रणी हैं। महिंद्रा XUV 3XO में भी 6 एयरबैग्स दिए गए हैं, जो ड्राइवर और पैसेंजर दोनों की सुरक्षा सुनिश्चित करते हैं। इसमें 2 फ्रंट, 2 साइड और 2 बैक एयरबैग्स शामिल हैं, जो इसे सुरक्षा के मामले में एक बेहतरीन विकल्प बनाते हैं।
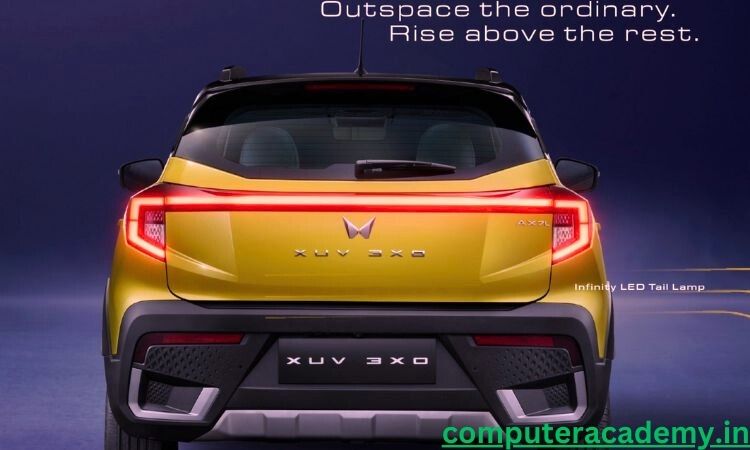
3. फुल LED टेल लाइट

महिंद्रा XUV 3XO में फुल LED टेल लाइट्स दी गई हैं, जो इसे और भी आकर्षक बनाती हैं। SUV सेगमेंट में यह एक नया ट्रेंड बन गया है, और महिंद्रा ने इस फीचर को एक अफोर्डेबल प्राइस में पेश करके बाजार में अपनी जगह मजबूत की है। यह न केवल इसकी डिजाइन को बेहतर बनाता है, बल्कि रात में भी इसकी दृश्यता को बढ़ाता है। Mahindra XUV 3XO: Features, Pricing

4. सभी पैसेंजर्स के लिए 3-पॉइंट सीट बेल्ट्स

सुरक्षा के दृष्टिकोण से 3-पॉइंट सीट बेल्ट्स बेहद महत्वपूर्ण होते हैं। 2022 में भारतीय सरकार ने इसे सभी वाहनों के लिए अनिवार्य कर दिया है।Mahindra XUV 3XO: Features, Pricing यह बेल्ट्स कंधे और हिप दोनों जगहों पर सुरक्षा प्रदान करते हैं, जिससे दुर्घटना के दौरान यात्री को बेहतर सुरक्षा मिलती है। महिंद्रा XUV 3XO में सभी पैसेंजर्स के लिए 3-पॉइंट सीट बेल्ट्स दिए गए हैं, जो इसे सुरक्षा के मामले में एक बेहतर विकल्प बनाते हैं।

5. इलेक्ट्रिकली एडजस्टेबल ORVMs

ड्राइवर के लिए मिरर सेट करना कई बार मुश्किल होता है, और यह एक महत्वपूर्ण सुरक्षा मुद्दा हो सकता है। महिंद्रा XUV 3XO में इलेक्ट्रिकली एडजस्टेबल ORVMs (Outside Rear View Mirrors) दिए गए हैं, जो ड्राइवर को अपनी सीट से उठे बिना मिरर को सेट करने की सुविधा प्रदान करते हैं। यह न केवल सुविधा को बढ़ाता है, बल्कि ड्राइविंग को भी सुरक्षित बनाता है।

महिंद्रा XUV 3XO: भविष्य की ओर एक कदम

महिंद्रा XUV 3XO को न सिर्फ एक नई SUV के रूप में देखा जा रहा है, बल्कि इसे महिंद्रा की ओर से भविष्य की ओर एक मजबूत कदम माना जा रहा है। Mahindra XUV 3XO: Features, Pricing यह SUV महिंद्रा की समर्पित इंजीनियरिंग और आधुनिक तकनीक का प्रमाण है, जो भारतीय बाजार की जरूरतों और वैश्विक मानकों को ध्यान में रखते हुए तैयार की गई है। Mahindra XUV 3XO: Features, Pricing
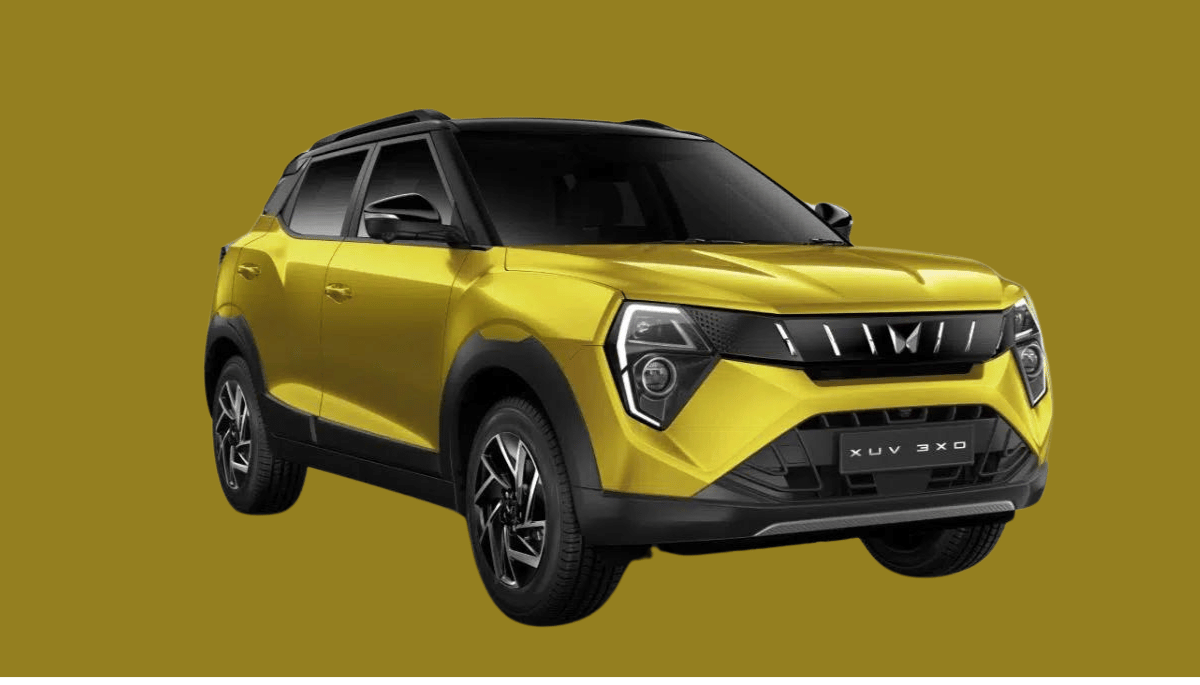
डिज़ाइन और लुक्स

महिंद्रा XUV 3XO का डिज़ाइन इसके लुक्स को और भी प्रभावशाली बनाता है। इसका शार्प और एयरोडायनामिक डिज़ाइन न केवल इसे आकर्षक बनाता है, बल्कि इसे उच्च गति पर भी स्थिर बनाए रखता है। फ्रंट ग्रिल और LED हेडलाइट्स इसे एक प्रीमियम लुक देते हैं। इसके अलावा, इसके ड्यूल-टोन कलर ऑप्शंस और अलॉय व्हील्स इसे युवा उपभोक्ताओं के बीच लोकप्रिय बना सकते हैं। Mahindra XUV 3XO: Features, Pricing

इंटीरियर्स और कंफर्ट

महिंद्रा XUV 3XO के इंटीरियर्स को भी बेहद प्रीमियम और आरामदायक बनाया गया है। इसमें लेदर अपहोल्स्ट्री, मल्टी-फंक्शन स्टीयरिंग व्हील, और टचस्क्रीन इंफोटेनमेंट सिस्टम जैसे फीचर्स दिए गए हैं। इसके अलावा, इसमें पर्याप्त लेग स्पेस और हेडरूम भी दिया गया है, जिससे लंबी यात्राएं भी आरामदायक बन जाती हैं।Mahindra XUV 3XO: Features, Pricing

इंफोटेनमेंट और कनेक्टिविटी

महिंद्रा XUV 3XO में लेटेस्ट इंफोटेनमेंट सिस्टम दिया गया है, जो एंड्रॉइड ऑटो और एप्पल कारप्ले को सपोर्ट करता है। इसका 10-इंच का टचस्क्रीन सिस्टम बेहद रिस्पॉन्सिव है,Mahindra XUV 3XO: Features, Pricing और इसमें नेविगेशन, म्यूजिक, और कॉलिंग फीचर्स भी शामिल हैं। इसके अलावा, इसमें 6-स्पीकर साउंड सिस्टम दिया गया है, जो आपकी ड्राइविंग को और भी मजेदार बना सकता है।

स्पेस और स्टोरेज

यह SUV न केवल यात्रियों के लिए आरामदायक है, बल्कि इसमें पर्याप्त स्टोरेज स्पेस भी दिया गया है। 265 लीटर के बूट स्पेस के साथ, यह SUV रोजमर्रा की जरूरतों के साथ-साथ लंबी यात्राओं के लिए भी पर्याप्त स्टोरेज स्पेस प्रदान करती है।Mahindra XUV 3XO: Features, Pricing इसके अलावा, इसमें 60:40 स्प्लिट-सीट्स दी गई हैं, जिससे आप स्पेस को अपनी जरूरत के अनुसार कस्टमाइज कर सकते हैं।

ड्राइविंग एक्सपीरियंस

महिंद्रा XUV 3XO में दिए गए तीन पावरट्रेन ऑप्शंस इसे एक वर्सटाइल ड्राइविंग मशीन बनाते हैं। इसके पेट्रोल और डीजल दोनों इंजन ऑप्शंस उच्च प्रदर्शन और माइलेज का बेहतरीन संयोजन प्रदान करते हैं। इसका सस्पेंशन सिस्टम भारतीय सड़कों पर एक स्मूथ और कंफर्टेबल ड्राइविंग एक्सपीरियंस सुनिश्चित करता है। इसके अलावा, इसमें मल्टीपल ड्राइविंग मोड्स भी दिए गए हैं, जिससे आप अपनी ड्राइविंग स्टाइल के अनुसार इसे एडजस्ट कर सकते हैं।

पर्यावरण के प्रति जिम्मेदारी

महिंद्रा XUV 3XO न केवल एक प्रदर्शनकारी SUV है, बल्कि इसे पर्यावरण के प्रति जिम्मेदार भी बनाया गया है। इसमें दिए गए इंजन BS6 मानकों का पालन करते हैं, जिससे यह कम प्रदूषण फैलाता है। इसके अलावा, महिंद्रा ने इसे अधिक फ्यूल एफिशिएंट बनाने पर भी ध्यान दिया है, जिससे यह न केवल पर्यावरण के लिए बेहतर है, बल्कि आपके बजट के लिए भी अनुकूल है।

प्रतिस्पर्धा में स्थान

भारतीय बाजार में Mahindra XUV 3XO का मुकाबला Hyundai Creta, Kia Seltos, और Tata Nexon जैसी SUVs से है। Mahindra XUV 3XO: Features, Pricing हालांकि, महिंद्रा ने इसे ऐसे फीचर्स और कीमत के साथ पेश किया है,Mahindra XUV 3XO: Features, Pricing जो इसे प्रतिस्पर्धा में एक मजबूत स्थान देता है। इसका प्रीमियम डिज़ाइन, उन्नत तकनीक, और प्रतिस्पर्धात्मक कीमत इसे भारतीय उपभोक्ताओं के लिए एक आकर्षक विकल्प बनाते हैं।

ग्राहकों की प्रतिक्रियाएं

महिंद्रा XUV 3XO की लॉन्चिंग के बाद, इसे बाजार में सकारात्मक प्रतिक्रिया मिली है। उपभोक्ताओं ने इसके डिज़ाइन, फीचर्स, और कीमत की तारीफ की है।Mahindra XUV 3XO: Features, Pricing खासकर युवा उपभोक्ताओं में यह SUV काफी लोकप्रिय हो रही है, जो अपने वाहन में स्टाइल और प्रदर्शन दोनों चाहते हैं। इसके अलावा, महिंद्रा की ब्रांड वैल्यू और सर्विस नेटवर्क इसे और भी भरोसेमंद बनाते हैं।

निष्कर्ष

महिंद्रा XUV 3XO अपने सेगमेंट में एक बेहतरीन विकल्प के रूप में उभर कर सामने आई है। इसके उन्नत फीचर्स, सुरक्षा के उपाय, और आकर्षक डिज़ाइन इसे एक टॉप-क्लास कॉम्पैक्ट SUV बनाते हैं। इस वाहन में दिए गए फीचर्स और इसकी कीमत इसे भारतीय बाजार में एक प्रमुख खिलाड़ी बनाते हैं।Mahindra XUV 3XO: Features, Pricing यदि आप एक नई SUV खरीदने की सोच रहे हैं, तो महिंद्रा XUV 3XO आपके लिए एक बेहतरीन विकल्प हो सकता है।

Bollywood Big Screen Lineup,Upcoming Movies and Release Dates for 2024-25

In 2024 and 2025, Bollywood is set to deliver a series of highly anticipated releases, including the much-awaited sequel Pushpa 2 featuring South star Allu Arjun. This article provides a Bollywood’s Big Screen Lineup comprehensive guide to the upcoming Bollywood movies for both years, including release dates and notable films. Bollywood’s Big Screen LineupBollywood Big Screen Lineup,Upcoming Movies and Release Dates for 2024-25

Bollywood Movies Releasing in 2024

Bollywood enthusiasts have a lot to look forward to in 2024. The year promises a diverse range of genres from thrilling dramas to light-hearted comedies. Here’s a curated list of the upcoming films:

  1. BhaiyaJi – Scheduled for release on May 24, 2024, this film stars Manoj Bajpayee in the lead role. Bollywood Big Screen Lineup
  2. Mr & Mrs Mahi – This film, set to release on May 31, 2024, features a dynamic storyline.
  3. Savi – Also releasing on May 31, 2024, Savi is expected to be a noteworthy addition to the year’s lineup.Bollywood Big Screen Lineup
  4. Baby John – Hitting theaters on May 31, 2024, this film promises an engaging narrative.
  5. Emergency – Scheduled for June 14, 2024, this movie is anticipated to make a significant impact.Bollywood Big Screen Lineup
  6. Chandu Champion – Another major release on June 14, 2024, starring prominent actors.
  7. Kalki 2298 AD – Releasing on June 27, 2024, this film is expected to be a futuristic spectacle.
  8. Ishq Vishq Rebound – Set for June 28, 2024, this sequel is eagerly awaited by fans.
  9. Kill – Arriving on July 5, 2024, it promises action-packed entertainment.
  10. Ulajh – Also releasing on July 5, 2024, it is another film to watch out for.
  11. Auron Mein Kahan DumTha – Slated for July 5, 2024, it is set to intrigue audiences.
  12. Sarfira – Scheduled for July 12, 2024, this film is expected to be a significant release.
  13. Bad Newz – Releasing on July 12, 2024, it is anticipated to bring a fresh perspective.
  14. Vedaa – Also arriving on July 12, 2024, this film promises to be a major highlight.
  15. Pushpa The Rule – One of the most awaited films, releasing on August 15, 2024.
  16. Singham 3 – Also hitting theaters on August 15, 2024, it is expected to be a major event.
  17. Khel Khel Mein – Scheduled for September 6, 2024, this film is set to offer entertainment.
  18. Jigra – Arriving on September 27, 2024, it is anticipated to captivate audiences.
  19. Skyforce – Set to release on October 2, 2024, promising a thrilling experience.
  20. Bhool Bhulaiyaa 3 – Releasing during Diwali 2024, it is expected to be a festive blockbuster.
  21. Raid 2 – Scheduled for November 15, 2024, this sequel is highly anticipated.
  22. Metro in Dino – Arriving on November 29, 2024, it promises to be an engaging watch.
  23. Tariq – Expected to release in 2024, adding to the year’s cinematic offerings.
  24. Chaava – Scheduled for December 6, 2024, it is set to be a notable release.
  25. Welcome to the Jungle – Arriving on December 20, 2024, expected to be a major hit.
  26. Sitaare Zameen Par – Also set for December 20, 2024, adding to the year’s end excitement.

Bollywood Movies Releasing in 2025

Looking ahead to 2025, Bollywood has an exciting lineup in store. While many release dates are yet to be announced, a few major films have already been scheduled: Bollywood Big Screen Lineup

  1. King – Set for release in 2025, this film is highly anticipated.
  2. Sikandar – Scheduled for Eid 2025, it promises to be a major release.
  3. Housefull 5 – Arriving on June 6, 2025, this film is expected to continue the success of its predecessors. Bollywood Big Screen Lineup

Additional Insights into Upcoming Bollywood Movies 2024-25

Bollywood’s landscape in 2024-25 is set to reflect several evolving trends that fans should look out for: Bollywood Big Screen Lineup Bollywood Big Screen Lineup

  • Sequel Craze: The trend of sequels continues to dominate, with films like Pushpa The Rule and Singham 3 among the highly anticipated releases. These sequels build on successful franchises, promising to deliver more of what fans loved in the originals. Bollywood Big Screen Lineup
  • Diverse Genres: From action-packed thrillers and sci-fi spectacles to light-hearted comedies and intense dramas, the upcoming releases cater to a wide array of tastes. This diversity ensures that there’s something for everyone, whether you’re in the mood for a gripping narrative or a feel-good comedy. Bollywood Big Screen Lineup
  • Star Power: Bollywood continues to leverage its star power, with major actors like Shah Rukh Khan, Salman Khan, and Akshay Kumar leading some of the biggest releases. Their involvement not only garners immediate attention but also ensures a high level of production value and fan engagement.Bollywood Big Screen Lineup Bollywood Big Screen Lineup

2. Highlighting Upcoming Blockbusters

Several films slated for 2024-25 are generating considerable buzz due to their unique premises, star-studded casts, or directorial pedigrees. Here are a few to keep on your radar:

  • Pushpa The Rule: The sequel to the 2021 blockbuster Pushpa: The Rise, this film is highly anticipated for its continuation of the epic saga starring Allu Arjun. Expect high-octane action, stunning visuals, and a gripping storyline.
  • Singham 3: Rohit Shetty’s Singham series has been a massive hit, and the third installment promises to deliver more of the high-energy action and drama that fans have come to expect.
  • Housefull 5: The Housefull franchise is known for its comedy and star ensemble. With the fifth installment, audiences can anticipate more laughs and memorable performances from a stellar cast.

3. Spotlight on Emerging Talents

In addition to established stars, Bollywood’s upcoming movies will also showcase new and emerging talents. These actors are poised to make significant impacts:

  • New Faces: Keep an eye out for fresh faces in the upcoming films, as new talent often brings innovative approaches and fresh energy to the screen.
  • Breakthrough Performances: Many actors are expected to deliver standout performances that could define their careers, making their movies must-watch events.

4. Expectations for Major Festivals and Releases

Bollywood releases are often timed to coincide with major festivals and holidays, adding an extra layer of excitement:

  • Diwali Releases: Films like Bhool Bhulaiyaa 3 are scheduled for Diwali, capitalizing on the festive mood to draw large audiences.
  • Eid and Other Festivals: Releases such as Sikandar during Eid 2025 are expected to attract significant attention and box office numbers due to the festive period.

5. Behind the Scenes: What to Expect

While the stars and release dates are exciting, the behind-the-scenes aspects also contribute to the success of these films:

  • Directorial Vision: Directors play a crucial role in shaping a film’s success. Upcoming films by renowned directors promise to bring unique storytelling and innovative techniques to the screen.
  • Production Quality: With advancements in technology, expect high production values, including cutting-edge special effects, impressive cinematography, and top-notch sound design.

6. Fan Engagement and Social Media Buzz

In today’s digital age, social media plays a crucial role in building hype around upcoming films:

  • Trailers and Teasers: The release of trailers and teasers on social media platforms generates excitement and provides glimpses into the films’ plots and aesthetics.
  • Star Interactions: Actors and filmmakers engaging with fans through social media platforms can boost anticipation and provide insights into the making of the films. Bollywood Big Screen Lineup

As Bollywood continues to evolve, several future trends could shape the film industry:

  • Cross-Border Collaborations: Increasing collaborations with international filmmakers and actors could bring fresh perspectives and broaden the appeal of Bollywood films.
  • Streaming Platforms: With the rise of streaming services, many films are also expected to have digital releases, providing more options for audiences to enjoy their favorite movies.

Conclusion

The Bollywood film calendar for 2024-25 is brimming with excitement and anticipation. Whether you’re eagerly awaiting sequels, exploring new talents, or preparing for festive releases, there’s plenty to look forward to. As the year progresses, stay tuned for updates, trailers, and more details about these upcoming movies.Bollywood Big Screen Lineup

What upcoming Bollywood film are you most excited about? Share your thoughts and expectations in the comments below!

,Upcoming Movies and Release Dates for 2024-25

How to Create and Edit Vouchers in Tally Prime Notes

Creating and editing vouchers in Tally Prime is an essential task for maintaining accurate financial records.Vouchers in Tally Prime Notes Vouchers are used to record all types of transactions, such as sales, purchases, payments, receipts, and adjustments. Here’s a step-by-step guide to creating and editing vouchers in Tally Prime: Vouchers in Tally Prime Notes


1. Creating Vouchers in Tally Prime

Step-by-Step Process:

Step 1: Open Tally Prime

  • Launch Tally Prime and log in to the company for which you want to create vouchers.

Step 2: Navigate to the Voucher Entry Screen

  • From the Gateway of Tally, select Voucher from the main menu. You can also use the shortcut key V to directly access the voucher entry screen.

Step 3: Select the Voucher Type

  • Depending on the type of transaction, you can choose the appropriate voucher type. For example:
  • F4: Contra Voucher
  • F5: Payment Voucher
  • F6: Receipt Voucher
  • F7: Journal Voucher
  • F8: Sales Voucher
  • F9: Purchase Voucher Alternatively, press Ctrl + V to view a full list of voucher types.

Step 4: Enter Voucher Details

  • Fill in the necessary details for the transaction. For example:
  • For Sales Vouchers, enter the customer name, item details, quantities, and sales value.
  • For Payment Vouchers, enter the payment amount, payee details, and mode of payment (cash/bank). Ensure that all fields, such as date, ledger accounts, and amount, are filled in accurately.

Step 5: Save the Voucher

  • After entering all the transaction details, press Ctrl + A to save the voucher, or simply click the Save button at the bottom.

2. Editing Vouchers in Tally Prime

At times, you may need to edit previously created vouchers to correct errors or update information. Here’s how to edit vouchers:

Step-by-Step Process:

Step 1: Go to the Gateway of Tally

  • From the main menu, navigate to Gateway of Tally.

Step 2: Open Daybook or Ledger Reports

  • To find a voucher you want to edit:
  • Open the Daybook by selecting Display More Reports > Daybook. This will show all vouchers recorded on a particular day.
  • Alternatively, go to Display More Reports > Ledger to find vouchers related to a specific ledger account.

Step 3: Select the Voucher to Edit

  • Scroll through the list of vouchers or use the date range to filter the voucher you want to edit.
  • Once you find the voucher, click on it to open.

Step 4: Edit the Voucher Details

  • After opening the voucher, you can edit fields like the date, amount, ledger accounts, or any other detail that needs correction. For example:
  • In a Sales Voucher, you can change the item quantity or the sales value.
  • In a Payment Voucher, you can adjust the amount or change the bank/cash account.

Step 5: Save the Changes

  • After making the necessary edits, press Ctrl + A to save the updated voucher.

3. Types of Vouchers You Can Create and Edit

  • Contra Voucher (F4): Used for cash/bank transfers, such as depositing or withdrawing money from the bank.
  • Payment Voucher (F5): Used to record payments made to suppliers, employees, or other entities.
  • Receipt Voucher (F6): Used to record receipts from customers or other sources.
  • Journal Voucher (F7): Used for non-cash transactions like depreciation, adjustments, or provisions.
  • Sales Voucher (F8): Used to record sales transactions of goods and services.
  • Purchase Voucher (F9): Used to record purchases of goods or services from suppliers.

Each voucher type has its own format and fields that must be filled out accurately.


4. Features of Voucher Creation and Editing in Tally Prime

  • Easy Navigation: Tally Prime offers a simple interface with quick navigation options to create and edit vouchers efficiently.
  • Multi-Voucher Entry: Tally Prime allows for the bulk creation and editing of vouchers, saving time for large volumes of transactions.
  • Auto-Complete Fields: The system auto-fills ledger accounts based on previous entries, making it easier to input data.
  • Voucher Duplication: You can duplicate existing vouchers with slight modifications, saving time when creating similar transactions.

5. Tips for Managing Vouchers in Tally Prime

  1. Review Daybook Regularly: Check your Daybook daily to ensure all vouchers are correctly entered and no errors remain.
  2. Use Shortcuts for Efficiency: Use shortcut keys like Ctrl + A to save vouchers quickly and Ctrl + V to access the list of voucher types.
  3. Set Authorizations: You can set permissions to control who can create, edit, or delete vouchers, ensuring that only authorized personnel make changes.
  4. Backup Your Data: Regularly backup your Tally Prime data to avoid losing important financial information.
  5. Use Tally Vault for Security: Enable Tally Vault to secure your data with passwords and restrict unauthorized access to vouchers.

6. Benefits of Creating and Editing Vouchers in Tally Prime

  • Efficient Record-Keeping: Tally Prime ensures all transactions are properly categorized and recorded, leading to accurate financial reporting.
  • Time-Saving: The voucher creation process is streamlined, making it easy to record multiple transactions in a short amount of time.
  • Flexibility in Editing: Tally Prime allows you to edit vouchers at any time, which is crucial for correcting errors or updating information.
  • Customization: Tally Prime offers customization options, allowing users to tailor vouchers to specific business needs. Vouchers in Tally Prime Notes

Conclusion

Creating and editing vouchers in Tally Prime is a straightforward process that ensures your business’s financial transactions are accurately recorded. With features like easy navigation, auto-complete fields, and multiple voucher types, Tally Prime helps businesses streamline their accounting processes and maintain a clear record of all financial activities. By following the steps and tips outlined above, you can efficiently manage your vouchers and ensure that your financial data remains accurate and up-to-date.


By utilizing the voucher creation and editing features in Tally Prime, businesses can manage their accounting tasks more effectively, ensuring compliance and financial accuracy.

Vouchers in Tally Prime Notes

  • #HowToCreateVouchersInTallyPrime
  • #TallyPrimeVoucherEntry
  • #EditVouchersInTallyPrime
  • #TallyPrimeAccounting
  • #VoucherManagementTallyPrime
  • #TallyPrimeFeatures

Photoshop Interface Overview 1

Photoshop Interface Overview

Adobe Photoshop is a powerful image editing software that offers a wide range of tools and features for Photoshop Interface Overview graphic design, photography, and digital art. Understanding the interface is crucial for maximizing efficiency and productivity. Photoshop Interface Overview

Main Interface Components

  1. Menu Bar: Contains all the primary commands and functions.
  2. Options Bar: Displays options for the currently selected tool.
  3. Tools Panel: Contains tools for creating and editing images.
  4. Document Window: Displays the open file.
  5. Panels: Provide additional controls and options for working with images.

Tabs in Photoshop

1. File Tab

The File tab contains options for opening, saving, and exporting files.

  • New: Creates a new document.
  • Open: Opens an existing document.
  • Browse in Bridge: Opens Adobe Bridge for managing files.
  • Open as Smart Object: Opens a file as a Smart Object.
  • Close: Closes the current document.
  • Save/Save As: Saves the document.
  • Export: Options for exporting the document in different formats.
  • Automate: Batch processing and automation options.
  • Print: Prints the document.

2. Edit Tab

The Edit tab provides options for making adjustments and modifications to your project.

  • Undo/Redo: Reverts or reapplies the last action.
  • Cut/Copy/Paste: Standard clipboard operations.
  • Content-Aware Fill: Fills a selection with content that matches the surrounding area.
  • Free Transform: Resizes, rotates, and skews a selected object.
  • Define Brush/Pattern/Custom Shape: Creates new brushes, patterns, or shapes.
  • Purge: Clears memory of undo history, clipboard, etc.
  • Preferences: Customizes Photoshop settings.

3. Image Tab

The Image tab focuses on adjustments and transformations to the entire image.

  • Mode: Changes the color mode of the image (RGB, CMYK, Grayscale, etc.).
  • Adjustments: Various image adjustment tools like Levels, Curves, Hue/Saturation, etc.
  • Auto Tone/Contrast/Color: Automatically adjusts tones, contrast, and colors.
  • Image Size: Changes the size of the image.
  • Canvas Size: Changes the size of the canvas.
  • Image Rotation: Rotates the image.
  • Crop: Crops the image.
  • Trim: Trims transparent or colored borders.
  • Reveal All: Expands the canvas to show all hidden areas.

4. Layer Tab

The Layer tab is crucial for managing layers within your document.

  • New: Creates new layers, groups, or adjustment layers.
  • Duplicate Layer: Creates a copy of the selected layer.
  • Delete: Removes the selected layer.
  • Layer Properties: Modifies layer properties like name, color, etc.
  • Layer Styles: Adds effects like shadows, glows, bevels, etc.
  • Blending Options: Customizes how layers blend together.
  • Smart Objects: Converts layers to Smart Objects for non-destructive editing.
  • Group Layers: Groups multiple layers into a single folder.
  • Align/Distribute: Aligns and distributes layers.

5. Select Tab

The Select tab offers tools for making and refining selections.

  • All: Selects the entire canvas.
  • Deselect: Deselects the current selection.
  • Reselect: Reselects the previous selection.
  • Inverse: Inverts the selection.
  • Modify: Expands, contracts, or feathers the selection.
  • Grow/Similar: Expands the selection based on color similarity.
  • Transform Selection: Transforms the current selection.
  • Select and Mask: Refines the edges of the selection.

6. Filter Tab

The Filter tab provides a range of filters for creative effects.

  • Filter Gallery: Applies artistic filters.
  • Blur: Blurs the image or selection.
  • Distort: Distorts the image in various ways.
  • Noise: Adds or reduces noise.
  • Pixelate: Pixelates the image.
  • Render: Renders clouds, fibers, lens flares, etc.
  • Sharpen: Sharpens the image.
  • Stylize: Applies various stylistic effects.
  • Other: Contains additional filters like High Pass, Minimum, etc.
  • Liquify: Allows for warping and reshaping of the image.

7. View Tab

The View tab manages how you see your document.

  • Zoom In/Out: Zooms in or out on the document.
  • Fit on Screen: Fits the document to the screen.
  • Actual Pixels: Displays the document at 100% size.
  • Rulers: Shows or hides rulers.
  • Guides: Adds, locks, or clears guides.
  • Snap: Snaps elements to guides, grid, or layers.
  • Screen Mode: Switches between different screen modes (Standard, Full Screen, etc.).

8. Window Tab

The Window tab controls the visibility of various panels and tools.

  • Workspace: Manages workspaces (Essentials, Photography, etc.).
  • Arrange: Arranges open documents in various ways.
  • Panels: Shows or hides specific panels like Layers, History, Adjustments, etc.

9. Help Tab

The Help tab provides access to Photoshop’s documentation and support resources.

  • Photoshop Help: Opens the help documentation.
  • System Info: Displays system information.
  • Updates: Checks for software updates.
  • About Photoshop: Displays information about the software.

Tools Panel Overview

Selection Tools

  • Move Tool: Moves selections, layers, and guides.
  • Marquee Tools: Creates rectangular, elliptical, single row, and single column selections.
  • Lasso Tools: Creates freehand, polygonal (straight-edged), and magnetic (snap-to) selections.
  • Quick Selection Tool: Quickly “paints” a selection using a round brush tip.
  • Magic Wand Tool: Selects similarly colored areas.

Crop and Slice Tools

  • Crop Tool: Crops the image.
  • Perspective Crop Tool: Crops the image with perspective adjustments.
  • Slice Tool: Divides the image into slices.
  • Slice Select Tool: Selects slices.

Measurement Tools

  • Eyedropper Tool: Samples colors from the image.
  • 3D Material Eyedropper Tool: Samples material from a 3D model.
  • Color Sampler Tool: Displays color values for selected areas.
  • Ruler Tool: Measures distances and angles.
  • Note Tool: Adds notes to the image.
  • Count Tool: Counts objects in the image.

Retouching and Painting Tools

  • Spot Healing Brush Tool: Removes blemishes and imperfections.
  • Healing Brush Tool: Repairs imperfections using sampled pixels.
  • Patch Tool: Repairs imperfections in a selected area using sampled pixels.
  • Content-Aware Move Tool: Moves a selected part of a picture and automatically fills the gap.
  • Red Eye Tool: Removes red-eye in flash photos.
  • Brush Tool: Paints brush strokes.
  • Pencil Tool: Paints hard-edged strokes.
  • Color Replacement Tool: Replaces a selected color with a new color.
  • Mixer Brush Tool: Simulates realistic painting techniques.

Drawing and Type Tools

  • Clone Stamp Tool: Paints with a sample of the image.
  • Pattern Stamp Tool: Paints with a pattern.
  • History Brush Tool: Paints a copy of the selected state or snapshot.
  • Art History Brush Tool: Paints with stylized strokes.
  • Eraser Tool: Erases pixels.
  • Background Eraser Tool: Erases areas to transparency by dragging.
  • Magic Eraser Tool: Erases solid-colored areas to transparency.
  • Gradient Tool: Creates gradients.
  • Paint Bucket Tool: Fills similarly colored areas with the foreground color.
  • 3D Material Drop Tool: Drops material onto a 3D object.
  • Blur Tool: Blurs areas of the image.
  • Sharpen Tool: Sharpens areas of the image.
  • Smudge Tool: Smudges data in the image.
  • Dodge Tool: Lightens areas of the image.
  • Burn Tool: Darkens areas of the image.
  • Sponge Tool: Changes the color saturation of areas.

Vector Tools

  • Pen Tool: Creates paths and shapes.
  • Freeform Pen Tool: Creates paths by drawing.
  • Add Anchor Point Tool: Adds anchor points to paths.
  • Delete Anchor Point Tool: Deletes anchor points from paths.
  • Convert Point Tool: Converts anchor points from corner to smooth.

Type Tools

  • Horizontal Type Tool: Creates horizontal type.
  • Vertical Type Tool: Creates vertical type.
  • Horizontal Type Mask Tool: Creates a selection in the shape of horizontal type.
  • Vertical Type Mask Tool: Creates a selection in the shape of vertical type.
  • Hand Tool: Moves the image within its window.

Rotate View Tool: Rotates the canvas.

Sure, let’s dive into the details of the tabs and tool menu in Adobe Photoshop. We’ll cover each tab, its functions, and the tools available in the toolbar. Here’s a comprehensive overview:

Photoshop Tabs and Tools Menu

1. File Tab

The File tab contains options for managing files, including opening, saving, and exporting documents.

  • New (Ctrl+N): Create a new document.
  • Open (Ctrl+O): Open an existing document.
  • Browse in Bridge: Access Adobe Bridge for file management.
  • Open As: Open a file as a specific format.
  • Open Recent: List of recently opened files.
  • Close (Ctrl+W): Close the current document.
  • Save (Ctrl+S): Save the current document.
  • Save As (Ctrl+Shift+S): Save the document with a new name or format.
  • Save for Web (Legacy): Optimize images for web use.
  • Export: Export files in various formats.
  • Automate: Batch process files with actions.
  • Scripts: Run scripts for automation.
  • File Info: View and edit metadata.
  • Print (Ctrl+P): Print the document.
  • Exit (Ctrl+Q): Exit Photoshop.

2. Edit Tab

The Edit tab includes tools for editing and manipulating your work.

  • Undo/Redo (Ctrl+Z): Undo or redo the last action.
  • Step Forward/Backward (Shift+Ctrl+Z / Alt+Ctrl+Z): Move through the history states.
  • Cut/Copy/Paste (Ctrl+X/Ctrl+C/Ctrl+V): Cut, copy, and paste selections.
  • Free Transform (Ctrl+T): Scale, rotate, skew, and distort selections.
  • Fill (Shift+F5): Fill selections with color or patterns.
  • Stroke: Add a stroke around a selection.
  • Content-Aware Fill: Fill areas with content-aware technology.
  • Puppet Warp: Warp and distort objects within the image.
  • Define Brush Pattern/Shape: Create custom brushes, patterns, and shapes.
  • Presets: Manage presets for brushes, swatches, gradients, and more.
  • Preferences: Access and modify Photoshop settings.

3. Image Tab

The Image tab provides options for adjusting and transforming images.

  • Mode: Change the color mode (RGB, CMYK, Grayscale, etc.).
  • Adjustments: Access various adjustment layers (Brightness/Contrast, Levels, Curves, etc.).
  • Auto Tone/Contrast/Color: Automatically adjust image tone, contrast, and color.
  • Image Size (Ctrl+Alt+I): Resize the image.
  • Canvas Size (Ctrl+Alt+C): Resize the canvas.
  • Image Rotation: Rotate the image.
  • Crop (C): Crop the image to a selected area.
  • Trim: Trim transparent or colored edges.
  • Reveal All: Expand the canvas to reveal hidden areas.
  • Duplicate: Duplicate the image.
  • Apply Image: Apply a source image to a target image.
  • Calculations: Create new channels based on existing ones.

4. Layer Tab

The Layer tab is essential for working with layers, which are fundamental in Photoshop.

  • New: Create new layers, groups, and adjustment layers.
  • Duplicate Layer: Duplicate the current layer.
  • Delete Layer: Delete the selected layer.
  • Layer Style: Apply styles like drop shadows, glows, and overlays.
  • Smart Objects: Convert layers to smart objects for non-destructive editing.
  • Rasterize: Convert smart objects, type layers, or shape layers to pixels.
  • Merge Layers: Merge multiple layers into one.
  • Align/Distribute: Align and distribute layers.
  • Arrange: Change the stacking order of layers.
  • Mask: Add layer masks for non-destructive editing.
  • Opacity/Fill: Adjust the transparency of layers.
  • Blending Options: Access and customize blending modes.

5. Type Tab

The Type tab contains tools and options for working with text.

  • New (Ctrl+Shift+N): Create new text layers.
  • Font/Size: Choose fonts and set text size.
  • Anti-Aliasing: Improve the smoothness of text edges.
  • Warp Text: Apply warp effects to text.
  • Convert to Shape: Convert text to editable shapes.
  • Character/Paragraph Panels: Access advanced text formatting options.
  • Check Spelling: Spell check text layers.
  • Find and Replace Text: Find and replace text in the document.
  • Language Options: Set the language for text layers.

6. Select Tab

The Select tab provides tools for making and refining selections.

  • All (Ctrl+A): Select the entire canvas.
  • Deselect (Ctrl+D): Deselect the current selection.
  • Reselect (Ctrl+Shift+D): Reselect the previous selection.
  • Inverse (Shift+Ctrl+I): Invert the current selection.
  • Modify: Modify the selection border.
  • Feather (Shift+F6): Soften the edges of the selection.
  • Color Range: Select areas based on color.
  • Focus Area: Select the in-focus areas of an image.
  • Select and Mask: Refine selections and masks.
  • Load/Save Selection: Save and load selection outlines.

7. Filter Tab

The Filter tab is where you can apply various filters to your images.

  • Convert for Smart Filters: Enable non-destructive filter application.
  • Filter Gallery: Access multiple filters in a gallery format.
  • Blur: Apply blur effects.
  • Distort: Apply distortion effects.
  • Noise: Add or reduce noise.
  • Pixelate: Apply pixelation effects.
  • Render: Create clouds, fibers, lens flares, etc.
  • Sharpen: Sharpen image details.
  • Stylize: Apply stylized effects.
  • Other: Access additional filters.
  • Liquify (Shift+Ctrl+X): Distort images using a brush-based tool.
  • Vanishing Point: Edit perspective in images.
  • Camera Raw Filter: Apply Camera Raw adjustments.

8. 3D Tab

The 3D tab is for creating and editing 3D content (available in Photoshop Extended versions).

  • New 3D Layer: Create 3D layers from files or text.
  • 3D Panel: Access the 3D panel for managing 3D objects.
  • 3D Mode: Switch between different 3D views and modes.
  • Render 3D Layer: Render the 3D scene.
  • 3D Print: Prepare 3D objects for printing.

9. View Tab

The View tab includes options for adjusting the workspace view.

  • Proof Setup: Set up proofing for different outputs.
  • Zoom In/Out (Ctrl+Plus/Minus): Zoom in or out.
  • Fit on Screen (Ctrl+0): Fit the image to the screen.
  • 100% (Ctrl+1): View the image at 100% zoom.
  • Rulers (Ctrl+R): Show or hide rulers.
  • Guides/Grid: Show or hide guides and grids.
  • Snap: Snap objects to guides, grid, or document bounds.
  • Screen Mode: Switch between different screen modes (Standard, Full Screen, etc.).

10. Window Tab

The Window tab is used for managing workspace panels and arranging windows.

  • Workspace: Save and load custom workspaces.
  • Arrange: Arrange open documents.
  • New Window: Open a new window for the current document.
  • Panels: Access and manage all Photoshop panels (Layers, Channels, Paths, etc.).

11. Help Tab

The Help tab provides access to Photoshop’s help resources.

  • Photoshop Help (F1): Open the help documentation.
  • Support Center: Access Adobe support.
  • System Info: View system information.
  • Updates: Check for software updates.
  • About Photoshop: View Photoshop version information.

Toolbar Overview

The toolbar in Photoshop contains a variety of tools used for creating and editing images. Here are some of the key tools:

  • Move Tool (V): Move selections, layers, and guides.
  • Marquee Tools (M): Make rectangular, elliptical, single row, and single column selections.
  • Lasso Tools (L): Make freehand, polygonal (straight-edged), and magnetic (snap-to) selections.
  • Quick Selection Tool (W): Quickly paint a selection using a round brush tip.
  • Magic Wand Tool (W): Select similarly colored areas.
  • Crop Tool (C): Crop the image to a selected area.
  • Slice Tool (C): Divide the image into slices.
  • Eyedropper Tool (I): Sample colors from the image.
  • Healing Brush Tool (J): Remove imperfections by painting with sampled pixels.
  • Clone Stamp Tool (S): Paint with a sample of the image.
  • History Brush Tool (Y): Paint a snapshot of an image’s history state.
  • Eraser Tool (E): Erase pixels on a layer.
  • Gradient Tool (G): Create gradient fills.
  • Paint Bucket Tool (G): Fill areas with color.
  • Blur/Sharpen/Smudge Tools (R): Manipulate image details.
  • Dodge/Burn/Sponge Tools (O): Lighten, darken, or saturate areas.
  • Pen Tool (P): Create paths and

Photoshop Interface OverviewPhotoshop Interface OverviewPhotoshop Interface OverviewPhotoshop Interface OverviewPhotoshop Interface OverviewPhotoshop Interface OverviewPhotoshop Interface OverviewPhotoshop Interface OverviewPhotoshop Interface OverviewPhotoshop Interface OverviewPhotoshop Interface OverviewPhotoshop Interface OverviewPhotoshop Interface OverviewPhotoshop Interface OverviewPhotoshop Interface OverviewPhotoshop Interface OverviewPhotoshop Interface OverviewPhotoshop Interface OverviewPhotoshop Interface OverviewPhotoshop Interface OverviewPhotoshop Interface OverviewPhotoshop Interface OverviewPhotoshop Interface OverviewPhotoshop Interface Overview

Understanding Programming Languages: A Comprehensive Introduction

Introduction to Programming Languages

In today’s digital age, programming languages are fundamental to the creation of software, websites, apps, and more. Understanding programming languages is crucial for anyone interested in technology, whether you’re aiming to become a software developer, a data scientist, or simply curious about how the digital world operates. This blog provides a comprehensive introduction to programming languages, their importance, and how they shape our technological landscape.

What is a Programming Language?

A programming language is a formal set of instructions that can be used to produce a wide range of outputs, including software applications, scripts, or algorithms. Programming languages allow humans to communicate with computers in a way that the machine can understand and execute. They provide the syntax and rules that dictate how commands are structured and processed.

Historical Context

The history of programming languages dates back to the early 19th century with Ada Lovelace, who is often considered the world’s first computer programmer for her work on Charles Babbage’s early mechanical general-purpose computer, the Analytical Engine. Since then, programming languages have evolved significantly: Understanding Programming Languages

  1. Early Languages: The first programming languages, such as Fortran (1957) and COBOL (1959), were designed for specific types of tasks: scientific computing and business data processing, respectively. Understanding Programming Languages
  2. Imperative Languages: The 1960s and 1970s saw the rise of imperative languages like C and Pascal. These languages are characterized by their focus on sequences of commands that change a program’s state. Understanding Programming Languages
  3. Object-Oriented Languages: The 1980s introduced object-oriented programming (OOP) languages like C++ and Smalltalk. OOP focuses on objects rather than actions and is used to model real-world scenarios more effectively. Understanding Programming Languages
  4. Modern Languages: Today, languages such as Python, JavaScript, and Rust dominate the scene, offering a range of features and paradigms that cater to various programming needs.

Types of Programming Languages

Programming languages can be categorized into several types based on their paradigms and functionalities: Understanding Programming Languages

  1. Procedural Languages: These languages, such as C and Pascal, follow a set of procedures or routines to perform tasks. They are based on the concept of procedure calls and include a sequence of statements that change the state of the program.
  2. Object-Oriented Languages: Languages like Java and C++ are based on objects, which are instances of classes. This paradigm focuses on data encapsulation, inheritance, and polymorphism, allowing for more modular and reusable code.
  3. Functional Languages: Languages such as Haskell and Lisp emphasize the evaluation of functions and avoid changing state or mutable data. Functional programming is known for its mathematical precision and is often used in academic and research contexts.
  4. Scripting Languages: Scripting languages like Python and JavaScript are designed for writing small programs or scripts that automate tasks or manage workflows. They are often used in web development and data analysis. Understanding Programming Languages
  5. Declarative Languages: Languages like SQL and Prolog focus on specifying what the program should accomplish rather than how to achieve it. They are commonly used in database querying and logic programming.
  6. Domain-Specific Languages: These are specialized languages designed for specific types of tasks or industries. Examples include HTML for web page design and CSS for styling.

Key Concepts in Programming Languages

  1. Syntax and Semantics: Syntax refers to the set of rules that defines the structure of statements in a programming language, while semantics refers to the meaning of these statements. Both are crucial for writing correct and efficient code. Understanding Programming Languages
  2. Variables and Data Types: Variables are used to store data that can be manipulated during program execution. Different languages have various data types (e.g., integers, strings, floats) that define the kind of data a variable can hold. Understanding Programming Languages
  3. Control Structures: Control structures such as loops (for, while) and conditionals (if, switch) allow programmers to dictate the flow of a program based on certain conditions or iterations.
  4. Functions and Procedures: Functions and procedures are blocks of code that perform specific tasks and can be reused throughout a program. They help in organizing code and improving modularity. Understanding Programming Languages
  5. Error Handling: Effective error handling ensures that a program can manage unexpected situations and continue to run smoothly. Languages provide various mechanisms for error detection and management, such as exceptions and assertions.
  6. Memory Management: Different languages handle memory management in different ways. Some languages, like C++, require manual memory management, while others, like Python, use automatic garbage collection to manage memory usage.

Choosing the Right Programming Language

Selecting the right programming language depends on several factors, including the project requirements, the desired performance, and the developer’s familiarity with the language. For example: Understanding Programming Languages

  • Python is known for its readability and ease of use, making it an excellent choice for beginners and for tasks such as web development, data analysis, and artificial intelligence.
  • JavaScript is essential for web development, enabling interactive features and dynamic content on websites. Understanding Programming Languages
  • C++ offers high performance and control over system resources, making it suitable for applications that require significant processing power, such as games or real-time simulations.
  • Java provides cross-platform compatibility, making it a popular choice for enterprise applications and Android development. Understanding Programming Languages

The landscape of programming languages continues to evolve with technological advancements. Some future trends include:

  1. Increased Focus on Performance: Languages like Rust are gaining popularity for their focus on safety and performance, particularly in systems programming and performance-critical applications.
  2. Integration with AI and Machine Learning: Languages that support AI and machine learning frameworks, such as Python and Julia, are likely to become even more prevalent as these technologies advance.
  3. Cross-Platform Development: Languages and frameworks that facilitate cross-platform development, such as Kotlin and Flutter, are becoming increasingly important for creating applications that work seamlessly across different devices and operating systems.
  4. Enhanced Developer Experience: Future programming languages are expected to offer improved tools and features to enhance the developer experience, such as better error handling, more expressive syntax, and advanced debugging capabilities.

Conclusion

Programming languages are the building blocks of the digital world. They enable us to communicate with computers and create the software that powers our everyday lives. By understanding the different types of programming languages, their key concepts, and emerging trends, you can make informed decisions about which languages to learn and use in your projects.

Whether you’re a novice looking to start your programming journey or an experienced developer seeking to broaden your skills, mastering programming languages will empower you to contribute to the ever-evolving world of technology. As technology continues to advance, staying up-to-date with programming languages and their capabilities will be essential for driving innovation and solving complex problems.

System Requirements for Tally Prime

To ensure optimal performance and functionality, Tally Prime has specific system requirements. Here’s a breakdown of the minimum and recommended specifications for running Tally Prime effectively: System Requirements for Tally Prime

1. Operating System

  • Minimum: Windows 8 or higher
  • Recommended: Windows 10 or higher (64-bit)

2. Processor

  • Minimum: Intel or AMD processor with a speed of 1 GHz or higher
  • Recommended: Dual-core processor or better for enhanced performance

3. RAM

  • Minimum: 2 GB
  • Recommended: 4 GB or more for smoother multitasking

4. Hard Disk Space

  • Minimum: 1 GB of free disk space
  • Recommended: 2 GB or more for storing backups and data files

5. Display

  • Minimum: 800 x 600 resolution
  • Recommended: 1280 x 800 or higher for better visibility and user experience

6. Network

  • An active internet connection is recommended for updates, support, and remote access features.

7. Additional Requirements

  • Microsoft .NET Framework: Tally Prime requires .NET Framework 4.5 or higher for certain functionalities.
  • Web Browser: For accessing online features and support, a modern web browser like Google Chrome, Firefox, or Microsoft Edge is recommended.

8. Backup Solution

  • It’s advisable to have an external storage device or cloud backup solution to ensure data safety.

Conclusion

System Requirements for Tally Prime

Before installing Tally Prime, ensure your system meets these requirements to enjoy its full range of features and benefits. Keeping your software updated and your hardware adequately equipped will enhance your overall experience and productivity with Tally Prime.

System Requirements for Tally Prime

YRKKH 2nd October 2024 Written Update Birthday twist

In the YRKKH 2nd October 2024 Written Update, the story unfolds with Vidya’s birthday celebration, where the Goenkas also join in the party. Rohit lovingly feeds the cake to Vidya,YRKKH 2nd October 2024 Written Update Birthday twist but the moment turns tense when Armaan intervenes, stopping Vidya from eating the cake due to the presence of walnuts, which were added unknowingly by Abhira, who had baked the cake.

Vidya becomes furious upon learning that Abhira was involved in her birthday arrangements. She lashes out at both Armaan and Abhira, declaring that they aren’t her children, only Rohit and Ruhi are. This bitter revelation deeply hurts Armaan, who leaves the party. Abhira, concerned about Armaan, rushes after him, but their confrontation leads to a heated argument about Vidya’s anger and her refusal to accept them as part of the family.

Armaan feels that his efforts to repair the broken relationships are only making matters worse. He expresses his frustration, stating that Abhira’s attempts are pushing him further away from the family and from Vidya’s love. He warns her to stop trying to fix things, as he fears losing whatever little love he has from Vidya.

The situation escalates when Ruhi, in a dramatic twist, faints in front of their car as Abhira follows Armaan. This causes a stir, and Vidya blames Abhira for the incident. However, amidst the chaos, a doctor arrives and confirms that Ruhi is pregnant, which shifts the atmosphere from tension to celebration. Rohit is overjoyed at the news and shares it with the family. Vidya celebrates with Rohit and Ruhi, but her cold attitude toward Abhira and Armaan remains evident.

YRKKH 2nd October 2024 Written Update Birthday twist

Vidya’s harsh behavior, especially when she indirectly taunts Abhira about her fertility issues, hurts Abhira deeply. Though Abhira and Armaan try to be part of the joyous occasion by congratulating Ruhi, Vidya doesn’t allow Abhira to get close, keeping her distance from the happy couple.

The episode concludes with Rohit and Ruhi receiving all the attention and becoming the center of the family, while Armaan and Abhira stand on the sidelines, silently dealing with the pain of rejection.

Read the complete story

WordPad Notes|वर्डपैड नोट्स Wordpad notes in hindi

WordPad Notes एक फ्री और सरल वर्ड प्रोसेसिंग एप्लिकेशन है, जो माइक्रोसॉफ्ट द्वारा विंडोज़ ऑपरेटिंग सिस्टम के साथ दिया जाता है। यह माइक्रोसॉफ्ट वर्ड की तुलना में हल्का और कम फीचर्स वाला सॉफ्टवेयर है, लेकिन नोट्स, लेटर, और साधारण टेक्स्ट डॉक्युमेंट्स तैयार करने के लिए उपयोगी है। WordPad, टाइपिंग के साथ कुछ फॉर्मेटिंग फीचर्स प्रदान करता है, जो इसे बेसिक डाक्यूमेंट्स तैयार करने के लिए आदर्श बनाता है।

WordPad की मुख्य विशेषताएँ:

1. टेक्स्ट एडिटिंग फीचर्स

  • फॉण्ट स्टाइल और आकार: WordPad आपको टेक्स्ट के फॉण्ट को बदलने की सुविधा देता है। आप अपनी पसंद के फॉण्ट स्टाइल और आकार चुन सकते हैं, जिससे आपके डाक्यूमेंट्स का लुक बेहतर होता है।
  • बोल्ड, इटैलिक, अंडरलाइन: WordPad में टेक्स्ट को बोल्ड (Bold), इटैलिक (Italic) या अंडरलाइन (Underline) करने के ऑप्शन होते हैं, जिससे आप विशेष शब्दों या वाक्यों को हाइलाइट कर सकते हैं।
  • फॉन्ट कलर और हाइलाइटिंग: आप अपने टेक्स्ट का रंग भी बदल सकते हैं और उसे हाइलाइट कर सकते हैं, जिससे आपका टेक्स्ट और आकर्षक बनता है।

2. पैरा फॉर्मेटिंग

  • एलाइनमेंट ऑप्शन: WordPad में टेक्स्ट को लेफ्ट, राइट, सेंटर या जस्टिफाई एलाइन करने के विकल्प होते हैं।
  • बुलेट और नंबरिंग: आप अपने टेक्स्ट को सूचीबद्ध करने के लिए बुलेट पॉइंट्स या नंबरिंग का उपयोग कर सकते हैं।
  • इंडेंटेशन: WordPad आपको पैराग्राफ को दाएं या बाएं इंडेंट करने का विकल्प देता है, जिससे आप अपने डाक्यूमेंट्स को प्रोफेशनल रूप दे सकते हैं।

3. टेक्स्ट डॉक्युमेंट सेव और ओपन करने के विकल्प

  • फाइल फॉर्मेट्स: WordPad Notes कई तरह के फाइल फॉर्मेट्स में डाक्यूमेंट्स सेव करने का विकल्प देता है, जैसे कि:
    • .rtf (Rich Text Format)
    • .txt (Plain Text)
    • .docx (Microsoft Word Document)
    • .odt (OpenDocument Text)
  • फाइल खोलना: WordPad Notes में आप अन्य फाइल फॉर्मेट्स जैसे .txt, .rtf, और .docx फाइल्स को खोल सकते हैं और उनमें एडिटिंग कर सकते हैं।

4. प्रिंटिंग फीचर्स

  • प्रिंट प्रीव्यू: डाक्यूमेंट प्रिंट करने से पहले आप उसका प्रिंट प्रीव्यू देख सकते हैं ताकि यह सुनिश्चित किया जा सके कि प्रिंट सही हो।
  • पेज सेटअप: प्रिंटिंग से पहले पेज की ओरिएंटेशन (पोर्ट्रेट या लैंडस्केप), मार्जिन, और पेपर का साइज चुन सकते हैं।

5. इमेज इनसर्ट करना

  • WordPad आपको डॉक्यूमेंट में इमेज इनसर्ट करने की सुविधा भी देता है। आप .jpg, .png, और .bmp जैसी फाइल फॉर्मेट्स में इमेज डाल सकते हैं। हालांकि, इमेज एडिटिंग ऑप्शन सीमित होते हैं।

6. फाइंड और रिप्लेस फीचर

  • फाइंड: यह फीचर किसी भी शब्द या टेक्स्ट को फटाफट ढूंढने में मदद करता है।
  • रिप्लेस: आप किसी विशेष टेक्स्ट को दूसरे टेक्स्ट से एक ही बार में बदल सकते हैं, जिससे एडिटिंग आसान हो जाती है।

7. कट, कॉपी, और पेस्ट ऑप्शन

  • WordPad में आप टेक्स्ट को कट (Cut), कॉपी (Copy), और पेस्ट (Paste) कर सकते हैं। यह फीचर आपको टेक्स्ट को एक स्थान से दूसरे स्थान पर आसानी से ले जाने की सुविधा देता है।

8. पृष्ठभूमि रंग बदलना

  • WordPad Notes में आप अपने डाक्यूमेंट के बैकग्राउंड का रंग बदल सकते हैं, जिससे आपका डाक्यूमेंट ज्यादा आकर्षक दिखता है।

WordPad का उपयोग:

WordPad उन लोगों के लिए एक उपयुक्त सॉफ्टवेयर है, जिन्हें:

  • बेसिक टेक्स्ट डाक्यूमेंट्स बनाने होते हैं।
  • नोट्स, पत्र, साधारण रिपोर्ट्स तैयार करनी होती हैं।
  • ज्यादा फाइल साइज की परवाह नहीं करते हैं, क्योंकि .rtf फाइल्स का साइज थोड़ा बड़ा होता है।
  • फॉर्मेटिंग के बेसिक फीचर्स की आवश्यकता होती है।

WordPad और Microsoft Word के बीच अंतर:

  • फीचर्स: WordPad Notes, Microsoft Word के मुकाबले बहुत कम फीचर्स प्रदान करता है। Word में एडवांस टेक्स्ट फॉर्मेटिंग, टेबल्स, ग्राफिक्स, स्टाइल्स, और एडिटिंग टूल्स होते हैं, जबकि WordPad एक साधारण फॉर्मेटिंग टूल है। WordPad Notes
  • फाइल फॉर्मेट्स: Microsoft Word .doc और .docx फाइल्स के लिए उपयुक्त है, जबकि WordPad साधारण .txt और .rtf फाइल्स के लिए ज्यादा अच्छा है।
  • उपयोग का उद्देश्य: Microsoft Word का उपयोग प्रोफेशनल डाक्यूमेंट्स, रिपोर्ट्स, और बुक्स तैयार करने के लिए किया जाता है, जबकि WordPad का उपयोग सामान्य नोट्स और साधारण डाक्यूमेंट्स के लिए होता है। WordPad Notes

WordPad Notes :

WordPad एक सरल और उपयोग में आसान वर्ड प्रोसेसिंग टूल है जो बेसिक टेक्स्ट एडिटिंग और फॉर्मेटिंग की सुविधाएं प्रदान करता है। यह सॉफ्टवेयर उन लोगों के लिए बेहतरीन है जो माइक्रोसॉफ्ट वर्ड की एडवांस सुविधाओं की जरूरत महसूस नहीं करते हैं और केवल बेसिक टेक्स्ट डॉक्युमेंट्स बनाना चाहते हैं। हालांकि, यदि आपको ज्यादा प्रोफेशनल और एडवांस डॉक्युमेंट्स तैयार करने हैं, तो Microsoft Word एक बेहतर विकल्प हो सकता है।

Fundamental of Accounting and Tally Prime Notes 1

Fundamental of Accounting and Tally Prime Notes Fundamental of Accounting and Tally Prime Notes 1

Fundamental of Accounting and Tally Prime Notes for Self Study and Computer Coaching classes. Step by Step training Notes with Practice assignment. Fundamental of Accounting and Tally Prime Notes 1

Definition of Accounting

Accounting is the process of identifying, recording, classifying and reporting information on financial transactions in a systematic manner for the purpose of providing financial information for decision making.

Types of Accounts

There are basically three types of Accounts maintained for transactions

  • Personal Account
  • Real Account
  • Nominal Account

Personal Account: Any individual person or any firms or any company or a bank is considered in a Personal account. For example:-   Rajesh Singh, Muna Enterprise,    Wipro Pvt Ltd, PNB Bank, Capital etc.

Real Account: Account of any physical things. The cash account or goods account are examples of Real account. For example:-   Cash, Land, Building, Furniture, Computer etc.

Nominal Account: Account of any invisible things that means that things are in terms of cash are examples of Nominal account. For example:-  Discount, Commission, Salary, Wages, Freight etc.

Golden Rules of Accounting

Personal Accounts

The ReceiverDebit (Dr)
The GiverCredit (Cr)

Real Accounts

What comes inDebit (Dr)
What goes outCredit (Cr)

Nominal Accounts

All Expenses or LossesDebit (Dr)
All Income or GainsCredit (Cr)

Entries in Account Book

1. Suresh started a business with cash Rs 1,80,000

Cash a/c  Dr180000
To Capital a/c           180000

2. Cash deposited into PNB bank Rs 55000

PNB bank a/c  Dr55000
To Cash a/c        55000

3. Purchase goods for cash Rs 22000

Purchase a/c Dr22000
To Cash a/c        22000

4. Bought goods fromSona Enterprise Rs 72000

Purchase a/c Dr72000
To Sona a/c        72000

5. Sold goods for cash Rs 16200

Cash a/c Dr16200
To Sales a/c        16200

6. Paid rent for the year by PNB bank chequeRs 6000

Rent a/c Dr6000
PNB bank a/c        6000

7. Withdraw cash into PNB bank Rs 40000

Cash a/c Dr40000
To PNB bank a/c        40000

8. Purchased furniture for cash Rs 5000

Furniture a/c Dr5000
To Cash a/c        5000

9. Sold goods to SuperRs 12700

Super a/c Dr12700
To Sales a/c        12700

10. Received cash from SuperRs 12446 and allowed him discount Rs 254

Cash a/c Dr12446
Discount allowed a/c    254
To Super a/c             12700

11. Paid wages Rs 1800

Wages a/c Dr1800
To Cash a/c        1800

12. Paid cash for trade Expenses Rs 2000

Trade Expenses a/c Dr2000
To Cash a/c        2000

13. Withdraw cash for private Expenses Rs 8000

Drawings a/c Dr8000
To Cash a/c        8000

14. Depreciation on Machinery Rs 50000

Depreciation a/c Dr50000
To  Machinery a/c        50000

Financial Year Start 1 April To 31 March

Thanks for study the Fundamental of Accounting and Tally Prime Notes

Study Guide: Fundamentals of Accounting and Tally Prime


Part 1: Fundamentals of Accounting

Objective: Understand the basic principles of accounting and prepare accurate financial records.


1. Introduction to Accounting

Key Concepts:

  • Definition: Accounting is the systematic process of recording, summarizing, and analyzing financial transactions.
  • Objectives: Record financial transactions, provide information for decision-making, ensure regulatory compliance.

Study Tips:

  • Memorize the definition and objectives of accounting.
  • Understand the importance of accurate financial records.

2. Basic Accounting Principles

Key Concepts:

  • Accrual Principle: Record revenues and expenses when they are incurred, not when cash is exchanged.
  • Consistency Principle: Use the same accounting methods over time to ensure comparability.
  • Conservatism Principle: Recognize expenses and liabilities early, but revenues only when they are assured.

Study Tips:

  • Learn the definitions and examples of each principle.
  • Practice applying these principles to different accounting scenarios.

3. Accounting Equation and Double-Entry System

Key Concepts:

  • Accounting Equation: Assets = Liabilities + Owner’s Equity.
  • Double-Entry System: Each transaction affects at least two accounts, with one debit and one credit entry to keep the accounting equation balanced.

Study Tips:

  • Memorize the accounting equation.
  • Practice recording transactions using the double-entry system.

4. Types of Accounts and Rules

Key Concepts:

  • Personal Accounts: Debit the receiver, Credit the giver.
  • Real Accounts: Debit what comes in, Credit what goes out.
  • Nominal Accounts: Debit all expenses and losses, Credit all incomes and gains.

Study Tips:

  • Learn the classification of accounts and their rules.
  • Practice categorizing different accounts and recording sample transactions.

5. Financial Statements

Key Concepts:

  • Income Statement: Shows revenues, expenses, and net profit/loss over a period.
  • Balance Sheet: Displays assets, liabilities, and equity at a specific point in time.
  • Cash Flow Statement: Tracks cash inflows and outflows from operating, investing, and financing activities.

Study Tips:

  • Understand the structure and components of each financial statement.
  • Practice creating simple financial statements with hypothetical data.

6. Journal and Ledger Entries

Key Concepts:

  • Journal Entries: Initial recording of transactions in the journal, including date, accounts affected, amounts, and a brief description.
  • Ledger: Posting journal entries into specific accounts to create a permanent record of transactions.

Study Tips:

  • Learn the format and components of journal entries.
  • Practice recording journal entries and posting them to the ledger.

7. Trial Balance and Rectification of Errors

Key Concepts:

  • Trial Balance: A list of all ledger accounts with their respective debit or credit balances to ensure that total debits equal total credits.
  • Rectification of Errors: Identifying and correcting errors in the books of accounts.

Study Tips:

  • Understand the purpose of a trial balance.
  • Practice preparing a trial balance and identifying errors in sample transactions.

Part 2: Tally Prime Overview

Objective: Learn and practice using Tally Prime for accounting and business management.


1. Getting Started with Tally Prime

Steps:

  1. Installation:
  • Download Tally Prime from the official website.
  • Follow the installation instructions.
  1. Company Creation:
  • Open Tally Prime.
  • Go to “Company Info” > “Create Company”.
  • Fill in company details and save.

Study Tips:

  • Familiarize yourself with the installation and setup process.
  • Practice creating a new company in Tally Prime.

2. Creating and Managing Accounts

Steps:

  1. Chart of Accounts:
  • Go to “Gateway of Tally” > “Accounts Info” > “Ledgers” > “Create”.
  • Enter ledger name, group, and other details.
  1. Voucher Entry:
  • Go to “Accounting Vouchers”.
  • Select voucher type (e.g., payment, receipt).
  • Enter details and save.

Study Tips:

  • Practice creating ledger accounts and recording various voucher types.
  • Understand the role of each type of voucher in accounting.

3. Inventory Management

Steps:

  1. Creating Stock Items:
  • Go to “Gateway of Tally” > “Inventory Info” > “Stock Items” > “Create”.
  • Enter item details like name, unit, opening balance.
  1. Inventory Vouchers:
  • Record stock transfers, deliveries, and receipts.

Study Tips:

  • Learn how to create and manage inventory items.
  • Practice recording inventory transactions using different vouchers.

4. Payroll Management

Steps:

  1. Employee Creation:
  • Go to “Gateway of Tally” > “Payroll Info” > “Employees” > “Create”.
  • Enter employee details.
  1. Processing Payroll:
  • Record attendance.
  • Process and disburse salaries.

Study Tips:

  • Understand the steps to manage employee records.
  • Practice processing payroll and recording attendance.

5. GST and Tax Management

Steps:

  1. Enabling GST:
  • Go to “Gateway of Tally” > “F11: Features” > “Statutory & Taxation”.
  • Enable GST and enter details.
  1. Recording GST Transactions:
  • Record sales and purchase invoices with GST.

Study Tips:

  • Learn how to enable and configure GST settings.
  • Practice recording transactions with GST.

6. Generating Reports

Steps:

  1. Financial Reports:
  • Profit & Loss, Balance Sheet.
  1. Inventory Reports:
  • Stock Summary, Movement Analysis.
  1. GST Reports:
  • GSTR-1, GSTR-3B.

Study Tips:

  • Understand the purpose and components of each type of report.
  • Practice generating reports in Tally Prime.

Practice Assignments Summary

Assignment 1: Define accounting and its objectives.
Assignment 2: Explain accrual principle with examples.
Assignment 3: Solve accounting equation problems.
Assignment 4: Classify accounts and record transactions.
Assignment 5: Create financial statements with hypothetical data.
Assignment 6: Record and post journal entries.
Assignment 7: Prepare trial balance and rectify errors.
Assignment 8: Install and set up Tally Prime.
Assignment 9: Create ledger accounts and record vouchers.
Assignment 10: Manage inventory and record transactions.
Assignment 11: Create employee records and process payroll.
Assignment 12: Enable GST and record GST transactions.
Assignment 13: Generate various reports in Tally Prime.

Fundamental of Accounting and Tally Prime Notes 1Fundamental of Accounting and Tally Prime Notes 1Fundamental of Accounting and Tally Prime Notes 1Fundamental of Accounting and Tally Prime Notes 1Fundamental of Accounting and Tally Prime Notes 1Fundamental of Accounting and Tally Prime Notes 1Fundamental of Accounting and Tally Prime Notes 1Fundamental of Accounting and Tally Prime Notes 1Fundamental of Accounting and Tally Prime Notes 1Fundamental of Accounting and Tally Prime Notes 1Fundamental of Accounting and Tally Prime Notes 1Fundamental of Accounting and Tally Prime Notes 1Fundamental of Accounting and Tally Prime Notes 1Fundamental of Accounting and Tally Prime Notes 1


Conclusion

These study notes provide a structured approach to learning accounting fundamentals and Tally Prime. Practice each assignment to reinforce your understanding and proficiency.

Fundamental of Accounting and Tally Prime Notes 1

Antivirus and Security Software

Antivirus and Security Software

Introduction

In today’s digital age, our reliance on computers and the internet has increased exponentially. With this increased reliance comes the risk of cyber threats, making antivirus and security software essential for protecting our devices and data. This guide provides a comprehensive overview of antivirus and security software, explaining their importance, functions, types, and how to choose the right one for your needs.

Importance of Antivirus and Security Software

  1. Protection from Malware: Malware includes viruses, worms, trojans, ransomware, spyware, and adware. Antivirus software is designed to detect, prevent, and remove these malicious programs.
  2. Data Protection: Personal and sensitive data, such as financial information, passwords, and private documents, need to be protected from unauthorized access and theft.
  3. System Performance: Viruses and malware can significantly slow down your computer and cause it to crash. Antivirus software helps maintain system performance by keeping it free from infections.
  4. Online Security: With the rise of online banking, shopping, and social media, protecting your online activities from phishing attacks and other online threats is crucial.
  5. Network Security: For businesses and home networks, antivirus software ensures that all connected devices are secure from threats that could spread across the network.

How Antivirus and Security Software Work

  1. Scanning and Detection: Antivirus software scans files, programs, and applications on your computer for known malware signatures. It uses a database of virus definitions to identify and flag suspicious files.
  2. Real-time Protection: This feature continuously monitors your system for any suspicious activity, providing immediate alerts and actions when a threat is detected.
  3. Heuristic Analysis: This method helps detect new, previously unknown malware by analyzing the behavior of programs and identifying suspicious activities.
  4. Automatic Updates: Antivirus software regularly updates its database with new virus definitions to protect against the latest threats.
  5. Quarantine and Removal: When a threat is detected, antivirus software can quarantine the malicious file to prevent it from causing harm. It can then either delete the file or clean it to remove the malware.

Types of Antivirus and Security Software

  1. Standalone Antivirus Programs: These are basic antivirus software solutions designed to protect against common malware. Examples include Avast Free Antivirus and AVG AntiVirus Free.
  2. Internet Security Suites: These comprehensive packages offer additional features such as firewall protection, anti-spam, parental controls, and more. Examples include Norton Internet Security and McAfee Total Protection.
  3. Endpoint Security: Designed for businesses, endpoint security solutions protect multiple devices within a network, ensuring overall network security. Examples include Symantec Endpoint Protection and Trend Micro OfficeScan.
  4. Cloud-based Antivirus: These solutions use cloud technology to perform scans and updates, reducing the load on your device. Examples include Panda Cloud Antivirus and Webroot SecureAnywhere.
  5. Mobile Security Apps: These are designed to protect smartphones and tablets from malware, phishing, and other threats. Examples include Kaspersky Mobile Security and Bitdefender Mobile Security.

Key Features to Look for in Antivirus and Security Software

  1. Real-time Protection: Ensures continuous monitoring and protection against threats.
  2. Automatic Updates: Keeps the software up-to-date with the latest virus definitions.
  3. User-friendly Interface: Easy-to-use interface for efficient navigation and management.
  4. Multi-device Protection: Covers multiple devices under a single license, including PCs, smartphones, and tablets.
  5. Firewall: Adds an extra layer of security by monitoring incoming and outgoing network traffic.
  6. Parental Controls: Helps protect children from inappropriate content and online threats.
  7. Email Protection: Scans emails for malicious attachments and links to prevent phishing attacks.
  8. VPN (Virtual Private Network): Encrypts internet connections for secure online activities, especially on public Wi-Fi networks.

How to Choose the Right Antivirus and Security Software

  1. Assess Your Needs: Determine the level of protection you need based on your usage. Home users might need basic protection, while businesses require more comprehensive solutions.
  2. Compatibility: Ensure the software is compatible with your operating system and devices.
  3. Performance Impact: Choose software that offers robust protection without significantly slowing down your system.
  4. Customer Support: Opt for providers that offer reliable customer support, including online resources, phone support, and live chat.
  5. Reviews and Ratings: Check reviews and ratings from trusted sources to gauge the effectiveness and reliability of the software.
  6. Free Trials and Money-back Guarantees: Take advantage of free trials and money-back guarantees to test the software before committing to a purchase.
https://computeracademy.in/wp-content/uploads/2024/07/Antivirus-and-Security-Software.mp4
  1. Norton Antivirus
  • Features: Real-time threat protection, password manager, secure VPN, parental controls, and cloud backup.
  • Pros: Comprehensive protection with many additional features, good customer support.
  • Cons: Higher cost compared to some competitors.
  1. McAfee Total Protection
  • Features: Anti-malware, firewall, VPN, password manager, identity theft protection, and multi-device support.
  • Pros: Robust protection with a wide range of features, excellent for families.
  • Cons: Can be resource-intensive, potentially slowing down your device.
  1. Bitdefender Antivirus Plus
  • Features: Anti-phishing, anti-fraud, multi-layer ransomware protection, and a secure browser for online banking.
  • Pros: Lightweight and effective with minimal impact on system performance.
  • Cons: Limited features in the basic plan, some advanced features are only available in higher-tier plans.
  1. Kaspersky Total Security
  • Features: Parental controls, password manager, VPN, file protection, and encryption.
  • Pros: High detection rates, excellent phishing protection, user-friendly interface.
  • Cons: Controversial in some regions due to geopolitical concerns.
  1. Trend Micro Maximum Security
  • Features: Anti-ransomware, email protection, privacy scanner for social media, and system optimization tools.
  • Pros: Strong protection against phishing and ransomware, good value for the price.
  • Cons: Somewhat higher false positive rates, can be resource-heavy.
  1. Avast Free Antivirus
  • Features: Real-time threat detection, malware protection, Wi-Fi security scanner, and a password manager.
  • Pros: Free with robust features, user-friendly interface.
  • Cons: Collects user data for advertising purposes, additional features require upgrading to paid versions.
  1. AVG AntiVirus Free
  • Features: Real-time security updates, malware and spyware removal, performance optimization tools.
  • Pros: Free with strong protection, minimal impact on system performance.
  • Cons: Lacks some advanced features found in paid solutions, data collection for advertising.

Best Practices for Using Antivirus and Security Software

  1. Regular Updates: Ensure that your antivirus software is set to update automatically. Regular updates are crucial for keeping your system protected against the latest threats.
  2. Scheduled Scans: Set up regular scans to check your system for malware. Full system scans should be performed weekly, while quick scans can be done daily.
  3. Safe Browsing Habits: Avoid downloading files or software from untrusted sources. Be cautious when clicking on links in emails, especially from unknown senders.
  4. Secure Networks: Use a secure, password-protected Wi-Fi network. Avoid accessing sensitive information over public Wi-Fi networks without using a VPN.
  5. Backup Your Data: Regularly back up important data to an external drive or cloud storage. This ensures that you can recover your data in case of a ransomware attack or hardware failure.
  6. Use Strong Passwords: Create complex, unique passwords for all your accounts. Consider using a password manager to keep track of them.
  7. Enable Firewall: Ensure that your firewall is enabled to protect your network from unauthorized access.
  8. Educate Yourself and Others: Stay informed about the latest cyber threats and educate family members or employees on safe online practices.

Future of Antivirus and Security Software

  1. Artificial Intelligence and Machine Learning: Future antivirus solutions will increasingly rely on AI and machine learning to detect and respond to threats more effectively. These technologies can identify patterns and behaviors associated with new and evolving malware.
  2. Cloud-based Solutions: Cloud-based antivirus solutions will become more prevalent, offering faster and more efficient threat detection and response. They reduce the burden on local devices and provide seamless updates.
  3. Integration with IoT Devices: As the Internet of Things (IoT) expands, antivirus software will need to protect a wider range of devices, including smart home appliances, wearables, and connected cars.
  4. Enhanced Privacy Features: With growing concerns over privacy, antivirus software will incorporate more robust privacy protection features, such as encrypted communications and better control over personal data.
  5. Zero Trust Security: This approach assumes that threats can come from both outside and inside the network. Future security solutions will adopt zero trust principles, continuously verifying the legitimacy of devices and users.

Antivirus and Security Software

Conclusion

Antivirus and security software are vital components in safeguarding our digital lives. By understanding the importance of these tools, how they work, and what features to look for, you can make informed decisions to protect your devices and data. Stay vigilant, keep your software updated, and practice safe online habits to maintain robust security in the ever-evolving digital landscape.