Category Archives: Home

Free Computer Courses For Beginners

Here are some excellent free computer courses for beginners available online:

1. Harvard’s CS50: Introduction to Computer Science

  • Platform: edX
  • Overview: A highly recommended, free introductory course to computer science. It covers programming languages like C, Python, and more.
  • Duration: 12 weeks (self-paced)
  • Link: CS50 on edX

2. Google IT Support Professional Certificate

  • Platform: Coursera
  • Overview: A beginner-level course designed to introduce students to IT support skills, including networking, operating systems, and security.
  • Duration: 6 months (self-paced)
  • Link: Google IT Support

3. LinkedIn Learning: Computer Literacy for Windows

  • Platform: LinkedIn Learning
  • Overview: A basic course on Windows OS, file management, and internet skills. Free for LinkedIn members.
  • Duration: 2 hours
  • Link: Computer Literacy for Windows

4. freeCodeCamp: Responsive Web Design

  • Platform: freeCodeCamp
  • Overview: A great starting point for learning HTML, CSS, and web design fundamentals. The course is project-based and suitable for beginners.
  • Duration: Self-paced
  • Link: Responsive Web Design

5. Alison: Introduction to Information Technology

  • Platform: Alison
  • Overview: A beginner course that covers essential computer skills like using word processors, spreadsheets, and the internet.
  • Duration: 3 hours
  • Link: Introduction to IT

6. Microsoft Learn: Introduction to Programming with Python

  • Platform: Microsoft Learn
  • Overview: This free course teaches Python, one of the most widely-used programming languages, and is great for beginners.
  • Duration: 10 hours
  • Link: Python with Microsoft

7. Khan Academy: Hour of Code

  • Platform: Khan Academy
  • Overview: A simple introduction to basic coding and computer science, perfect for absolute beginners.
  • Duration: 1 hour (self-paced)
  • Link: Hour of Code

8. Codecademy: Learn JavaScript

  • Platform: Codecademy
  • Overview: This free course offers an introduction to JavaScript, a key language for web development.
  • Duration: 30 hours (self-paced)
  • Link: Learn JavaScript

9. Coursera: Computer Science 101 by Stanford University

  • Platform: Coursera
  • Overview: This free course offers an introduction to computers and programming, covering basic concepts like computer hardware and software.
  • Duration: 6 weeks
  • Link: Computer Science 101

10. Udemy: IT for Beginners

  • Platform: Udemy
  • Overview: A free beginner course that covers basic IT skills like using email, working with files, and internet basics.
  • Duration: 4.5 hours
  • Link: IT for Beginners

Here are 10 more free computer courses for beginners:

11. Udacity: Intro to HTML and CSS

  • Platform: Udacity
  • Overview: This free course introduces HTML and CSS, the core languages used in web development. It’s perfect for beginners wanting to learn website design basics.
  • Duration: 3 weeks (self-paced)
  • Link: Intro to HTML and CSS

12. IBM SkillsBuild: Introduction to Cybersecurity

  • Platform: IBM SkillsBuild
  • Overview: A free course for beginners interested in learning the basics of cybersecurity, including how to protect devices and data.
  • Duration: 6 hours
  • Link: Introduction to Cybersecurity

13. Pluralsight: Computer Basics

  • Platform: Pluralsight
  • Overview: This free course offers a basic understanding of how computers work, covering hardware, software, and operating systems.
  • Duration: 1 hour
  • Link: Computer Basics

14. MIT OpenCourseWare: Introduction to Programming in Java

  • Platform: MIT OCW
  • Overview: A free beginner course that introduces programming concepts using Java, focusing on problem-solving skills.
  • Duration: 12 weeks (self-paced)
  • Link: MIT Java Course

15. Code.org: Computer Science Fundamentals

  • Platform: Code.org
  • Overview: A great resource for beginners, especially school students, to learn computer science basics through interactive tutorials and games.
  • Duration: Self-paced
  • Link: Code.org Fundamentals

16. Alison: Computer Networking – Digital Network Security

  • Platform: Alison
  • Overview: This free course covers networking basics and digital security, making it a great starting point for those interested in IT security.
  • Duration: 3-4 hours
  • Link: Digital Network Security

17. Microsoft Learn: Introduction to Databases

  • Platform: Microsoft Learn
  • Overview: A free course that covers the fundamentals of database management, including SQL, for beginners looking to work with data.
  • Duration: 6 hours
  • Link: Introduction to Databases

18. FutureLearn: Introduction to Web Development

  • Platform: FutureLearn
  • Overview: A free course teaching HTML, CSS, and JavaScript to beginners who want to start building websites.
  • Duration: 2 weeks (self-paced)
  • Link: Web Development

19. Khan Academy: Computer Programming Basics

  • Platform: Khan Academy
  • Overview: A free course teaching beginners the basics of programming with JavaScript, including animations and games.
  • Duration: Self-paced
  • Link: Khan Academy Programming

20. SoloLearn: Learn C++

  • Platform: SoloLearn
  • Overview: A free course focused on C++, a popular programming language for systems and application development.
  • Duration: Self-paced
  • Link: Learn C++

These additional free courses cover a variety of topics from programming to web development and cybersecurity, offering a comprehensive foundation for beginners in IT and computer science.Free computer courses for beginners 2024,
Free online computer classes for beginners,
Best free computer training for beginners,
Free basic computer skills courses,
Learn computer basics for free online,
Free IT courses for beginners,
Computer literacy courses for free,
Free computer courses with certificates,

These courses provide a solid foundation for beginners to gain computer skills and are accessible for free from various platforms.
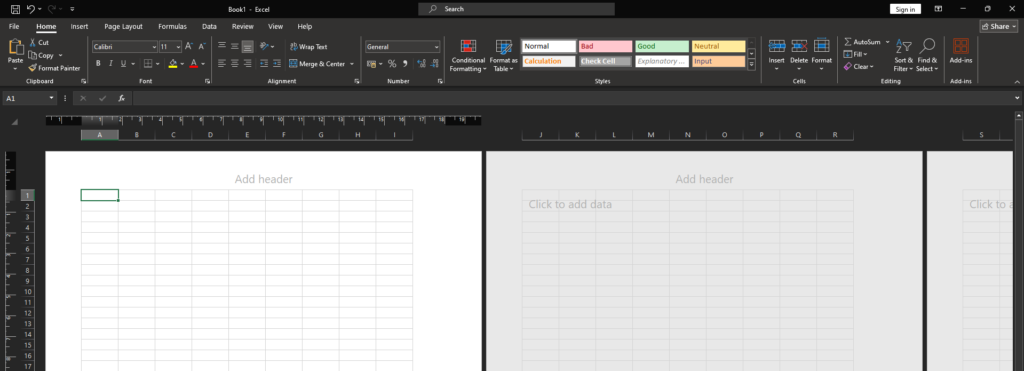
Microsoft Excel Comprehensive Guide to Excel Formulas 1

Introduction

Microsoft Excel is a powerful spreadsheet program developed byMicrosoft Excel Comprehensive Guide to Excel Formulas 1 It is used for data organization, calculation, and analysis. Excel is an essential tool in many fields, including business, finance, science, and education. This guide provides a detailed overview of Excel’s features, functions, and tools, making it easy to teach and understand.Microsoft Excel:Comprehensive Guide to Excel Formulas 1

1. The Excel Interface

1.1 Workbook and Worksheets

  • Workbook: An Excel file that contains one or more worksheets.
  • Worksheet: A single spreadsheet within a workbook, made up of rows and columns where data is entered.

1.2 The Ribbon

The Ribbon is the toolbar at the top of Excel, containing tabs and commands. It is divided into several tabs:

  • Home Tab: Basic formatting and editing commands.
  • Insert Tab: Tools to insert tables, charts, and other objects.
  • Page Layout Tab: Options for page setup, themes, and printing.
  • Formulas Tab: Tools for working with formulas and functions.
  • Data Tab: Tools for data management, such as sorting and filtering.
  • Review Tab: Proofing tools, comments, and protection options.
  • View Tab: Options for viewing and arranging the worksheet.

2. Key Tabs and Their Functions

2.1 Home Tab

  • Clipboard Group: Cut, copy, paste, and format painter.
  • Font Group: Font type, size, color, and styles (bold, italic, underline).
  • Alignment Group: Text alignment, orientation, and wrapping.
  • Number Group: Number formatting (currency, percentage, date).
  • Styles Group: Conditional formatting, cell styles.
  • Cells Group: Insert, delete, format cells.
  • Editing Group: Find, replace, and select tools.

2.2 Insert Tab

  • Tables Group: Insert tables and pivot tables.
  • Illustrations Group: Insert pictures, shapes, icons, and 3D models.
  • Add-ins Group: Insert add-ins to enhance functionality.
  • Charts Group: Create various charts (column, line, pie, bar).
  • Sparklines Group: Insert mini charts within cells.
  • Filters Group: Insert slicers and timelines for filtering data.
  • Links Group: Insert hyperlinks.
  • Text Group: Insert text boxes, headers, footers, and WordArt.
  • Symbols Group: Insert equations and symbols.

2.3 Page Layout Tab

  • Themes Group: Apply themes to the workbook.
  • Page Setup Group: Set margins, orientation, size, print area.
  • Scale to Fit Group: Adjust the scaling of the worksheet for printing.
  • Sheet Options Group: Show or hide gridlines and headings.
  • Arrange Group: Arrange objects on the worksheet.

2.4 Formulas Tab

  • Function Library Group: Access various functions (math, logical, text, date & time, lookup).
  • Defined Names Group: Define and manage named ranges.
  • Formula Auditing Group: Trace precedents, dependents, and check errors.
  • Calculation Group: Set calculation options and recalculate the worksheet.

2.5 Data Tab

  • Get & Transform Data Group: Import data from various sources.
  • Queries & Connections Group: Manage queries and connections.
  • Sort & Filter Group: Sort and filter data.
  • Data Tools Group: Data validation, consolidation, text to columns.
  • Forecast Group: Create forecasts and what-if analysis.
  • Outline Group: Group and ungroup data.

2.6 Review Tab

  • Proofing Group: Spell check, thesaurus.
  • Accessibility Group: Check accessibility.
  • Insights Group: Smart lookup.
  • Language Group: Translate text.
  • Comments Group: Add, delete, and manage comments.
  • Protect Group: Protect sheets and workbooks.

2.7 View Tab

  • Workbook Views Group: Normal, Page Break Preview, Page Layout.
  • Show Group: Show or hide rulers, gridlines, headings, formula bar.
  • Zoom Group: Zoom in or out of the worksheet.
  • Window Group: New window, arrange, freeze panes, split.
  • Macros Group: Record and manage macros.

3. Essential Excel Functions

3.1 Basic Functions

  • SUM: Adds a range of cells.
  • =SUM(A1:A10)
  • AVERAGE: Calculates the average of a range.
  • =AVERAGE(B1:B10)
  • MIN/MAX: Finds the minimum/maximum value in a range.
  • =MIN(C1:C10)
  • =MAX(D1:D10)

3.2 Logical Functions

  • IF: Performs a logical test and returns one value for TRUE and another for FALSE.
  • =IF(A1>10, "Yes", "No")
  • AND/OR: Combines multiple conditions.
  • =AND(A1>10, B1<20)
  • =OR(A1>10, B1<20)

3.3 Text Functions

  • CONCATENATE: Joins several text strings into one.
  • =CONCATENATE(A1, " ", B1)
  • LEFT/RIGHT/MID: Extracts characters from a text string.
  • =LEFT(A1, 5)
  • =RIGHT(A1, 5)
  • =MID(A1, 2, 3)

3.4 Date and Time Functions

  • TODAY/NOW: Returns the current date/time.
  • =TODAY()
  • =NOW()
  • DATE: Creates a date from year, month, and day.
  • =DATE(2024, 6, 28)
  • DAYS: Calculates the number of days between two dates.
  • =DAYS(B1, A1)

3.5 Lookup and Reference Functions

  • VLOOKUP: Looks for a value in the first column of a table and returns a value in the same row from another column.
  • =VLOOKUP(A1, B1:C10, 2, FALSE)
  • HLOOKUP: Looks for a value in the first row of a table and returns a value in the same column from another row.
  • =HLOOKUP(A1, B1:K10, 3, FALSE)
  • INDEX/MATCH: More flexible alternatives to VLOOKUP/HLOOKUP.
  • =INDEX(B1:B10, MATCH(A1, C1:C10, 0))

4. Data Analysis Tools

4.1 PivotTables

PivotTables are used to summarize, analyze, explore, and present data.

  • Creating a PivotTable: Select the data range and go to Insert > PivotTable.
  • Field List: Drag fields to Rows, Columns, Values, and Filters areas.
  • PivotChart: Create charts from PivotTables for visual data analysis.

4.2 Charts and Graphs

Excel offers various chart types to represent data visually.

  • Types of Charts: Column, Line, Pie, Bar, Area, Scatter, etc.
  • Creating a Chart: Select the data range and go to Insert > Chart.
  • Formatting Charts: Customize chart elements like titles, labels, and legends.

5. Data Management

5.1 Sorting and Filtering

  • Sorting: Arrange data in ascending or descending order.
  • Go to Data > Sort.
  • Filtering: Display only the data that meets certain criteria.
  • Go to Data > Filter.

5.2 Data Validation

  • Data Validation: Restrict the type of data that can be entered in a cell.
  • Go to Data > Data Validation.

5.3 Conditional Formatting

  • Conditional Formatting: Apply formatting based on cell values.
  • Go to Home > Conditional Formatting.

6. Advanced Excel Features

6.1 Macros

Macros are used to automate repetitive tasks.

  • Recording a Macro: Go to View > Macros > Record Macro.
  • Running a Macro: Go to View > Macros > View Macros.

6.2 Solver

Solver is an add-in for complex optimization problems.

  • Enabling Solver: Go to File > Options > Add-ins > Solver Add-in.
  • Using Solver: Go to Data > Solver, define the problem, and solve.

6.3 Data Analysis Toolpak

The Data Analysis Toolpak is an add-in with advanced data analysis tools.

  • Enabling Data Analysis Toolpak: Go to File > Options > Add-ins > Analysis Toolpak.
  • Using Data Analysis Toolpak: Go to Data > Data Analysis.
Microsoft Excel:Comprehensive Guide to Excel Formulas 1

Comprehensive Guide to Excel Formulas

Microsoft Excel is renowned for its powerful formula and function capabilities, enabling users to perform a vast range of calculations, data manipulations, and analyses. Below is a detailed compilation of essential and advanced Excel formulas, categorized for easier understanding and teaching.

1. Basic Arithmetic Formulas

  • Addition: =A1 + B1
  • Subtraction: =A1 - B1
  • Multiplication: =A1 * B1
  • Division: =A1 / B1
  • Exponentiation: =A1 ^ B1

2. Statistical Functions

  • SUM: Adds a range of cells.
  • =SUM(A1:A10)
  • AVERAGE: Calculates the average of a range.
  • =AVERAGE(B1:B10)
  • MEDIAN: Finds the median value in a range.
  • =MEDIAN(C1:C10)
  • MODE: Returns the most frequently occurring value.
  • =MODE(D1:D10)
  • MIN: Finds the minimum value in a range.
  • =MIN(E1:E10)
  • MAX: Finds the maximum value in a range.
  • =MAX(F1:F10)
  • COUNT: Counts the number of cells with numerical data.
  • =COUNT(G1:G10)
  • COUNTA: Counts the number of non-empty cells.
  • =COUNTA(H1:H10)
  • COUNTIF: Counts cells that meet a condition.
  • =COUNTIF(I1:I10, ">10")
  • SUMIF: Adds cells that meet a condition.
  • =SUMIF(J1:J10, ">10")

3. Logical Functions

  • IF: Performs a logical test and returns one value for TRUE and another for FALSE.
  • =IF(A1 > 10, "Yes", "No")
  • AND: Returns TRUE if all conditions are true.
  • =AND(A1 > 10, B1 < 20)
  • OR: Returns TRUE if any condition is true.
  • =OR(A1 > 10, B1 < 20)
  • NOT: Reverses the logical value.
  • =NOT(A1 > 10)
  • IFERROR: Returns a value if there is an error.
  • =IFERROR(A1/B1, "Error")

4. Text Functions

  • CONCATENATE: Joins several text strings into one.
  • =CONCATENATE(A1, " ", B1)
  • TEXTJOIN: Joins text strings with a delimiter.
  • =TEXTJOIN(", ", TRUE, A1:A5)
  • LEFT: Extracts a specified number of characters from the left.
  • =LEFT(A1, 5)
  • RIGHT: Extracts a specified number of characters from the right.
  • =RIGHT(A1, 5)
  • MID: Extracts characters from the middle of a text string.
  • =MID(A1, 2, 3)
  • LEN: Returns the length of a text string.
  • =LEN(A1)
  • FIND: Finds the starting position of a substring.
  • =FIND("text", A1)
  • SEARCH: Similar to FIND but case-insensitive.
  • =SEARCH("text", A1)
  • UPPER: Converts text to uppercase.
  • =UPPER(A1)
  • LOWER: Converts text to lowercase.
  • =LOWER(A1)
  • PROPER: Converts text to proper case.
  • =PROPER(A1)
  • TRIM: Removes extra spaces.
  • =TRIM(A1)

5. Date and Time Functions

  • TODAY: Returns the current date.
  • =TODAY()
  • NOW: Returns the current date and time.
  • =NOW()
  • DATE: Creates a date from year, month, and day.
  • =DATE(2024, 6, 28)
  • DAY: Returns the day of the month.
  • =DAY(A1)
  • MONTH: Returns the month.
  • =MONTH(A1)
  • YEAR: Returns the year.
  • =YEAR(A1)
  • HOUR: Returns the hour.
  • =HOUR(A1)
  • MINUTE: Returns the minute.
  • =MINUTE(A1)
  • SECOND: Returns the second.
  • =SECOND(A1)
  • DAYS: Calculates the number of days between two dates.
  • =DAYS(A1, B1)
  • NETWORKDAYS: Calculates the number of working days between two dates.
  • =NETWORKDAYS(A1, B1)
  • EDATE: Returns a date a specified number of months before or after a given date.
  • =EDATE(A1, 3)

6. Lookup and Reference Functions

  • VLOOKUP: Looks for a value in the first column and returns a value in the same row from another column.
  • =VLOOKUP(A1, B1:C10, 2, FALSE)
  • HLOOKUP: Looks for a value in the first row and returns a value in the same column from another row.
  • =HLOOKUP(A1, B1:K10, 3, FALSE)
  • INDEX: Returns the value of a cell in a table based on the row and column number.
  • =INDEX(A1:B10, 2, 1)
  • MATCH: Searches for a value in a range and returns the relative position.
  • =MATCH(A1, B1:B10, 0)
  • OFFSET: Returns a reference to a range that is offset from a starting cell.
  • =OFFSET(A1, 2, 3)
  • INDIRECT: Returns the reference specified by a text string.
  • =INDIRECT("A" & B1)
  • CHOOSE: Returns a value from a list of values based on a given position.
  • =CHOOSE(A1, "Red", "Green", "Blue")

7. Financial Functions

  • PMT: Calculates the payment for a loan based on constant payments and interest rate.
  • =PMT(rate, nper, pv, [fv], [type])
  • PV: Calculates the present value of an investment.
  • =PV(rate, nper, pmt, [fv], [type])
  • FV: Calculates the future value of an investment.
  • =FV(rate, nper, pmt, [pv], [type])
  • NPV: Calculates the net present value of an investment based on a series of cash flows and a discount rate.
  • =NPV(rate, value1, [value2], …)
  • IRR: Calculates the internal rate of return for a series of cash flows.
  • =IRR(values, [guess])
  • XIRR: Calculates the internal rate of return for a series of cash flows with specific dates.
  • =XIRR(values, dates, [guess])

8. Engineering Functions

  • CONVERT: Converts a number from one measurement system to another.
  • =CONVERT(number, "from_unit", "to_unit")
  • DEC2BIN: Converts a decimal number to binary.
  • =DEC2BIN(number, [places])
  • BIN2DEC: Converts a binary number to decimal.
  • =BIN2DEC(number)
  • DEC2HEX: Converts a decimal number to hexadecimal.
  • =DEC2HEX(number, [places])
  • HEX2DEC: Converts a hexadecimal number to decimal.
  • =HEX2DEC(number)

9. Information Functions

  • CELL: Returns information about the formatting, location, or contents of a cell.
  • =CELL("type", A1)
  • ISNUMBER: Checks if a value is a number.
  • =ISNUMBER(A1)
  • ISTEXT: Checks if a value is text.
  • =ISTEXT(A1)
  • ISBLANK: Checks if a cell is empty.
  • =ISBLANK(A1)
  • ISERROR: Checks if a value is an error.
  • =ISERROR(A1)
  • ISNA: Checks if a value is the #N/A error.
  • =ISNA(A1)

10. Array Formulas

Array formulas perform multiple calculations on one or more items in an array. They are entered using Ctrl+Shift+Enter.

  • SUMPRODUCT: Multiplies corresponding elements in arrays and returns the sum.
  • =SUMPRODUCT(A1:A10, B1:B10)
  • TRANSPOSE: Transposes the orientation of a range.
  • =TRANSPOSE(A1:B2)
  • MMULT: Returns the matrix product of two arrays.
  • =MMULT(A1:B2, C1:D2)

Microsoft Excel: A Comprehensive Guide for Teaching | Comprehensive Guide to Excel Formulas

Conclusion

Microsoft Excel Comprehensive Guide to Excel Formulas 1 Microsoft Excel Comprehensive Guide to Excel Formulas 1Microsoft Excel Comprehensive Guide to Excel Formulas 1Microsoft Excel Comprehensive Guide to Excel Formulas 1Microsoft Excel Comprehensive Guide to Excel Formulas 1Microsoft Excel Comprehensive Guide to Excel Formulas 1Microsoft Excel Comprehensive Guide to Excel Formulas 1Microsoft Excel Comprehensive Guide to Excel Formulas 1Microsoft Excel Comprehensive Guide to Excel Formulas 1Microsoft Excel Comprehensive Guide to Excel Formulas 1Microsoft Excel Comprehensive Guide to Excel Formulas 1Microsoft Excel Comprehensive Guide to Excel Formulas 1Microsoft Excel Comprehensive Guide to Excel Formulas 1Microsoft Excel Comprehensive Guide to Excel Formulas 1Microsoft Excel Comprehensive Guide to Excel Formulas 1Microsoft Excel Comprehensive Guide to Excel Formulas 1Microsoft Excel Comprehensive Guide to Excel Formulas 1Microsoft Excel Comprehensive Guide to Excel Formulas 1Microsoft Excel Comprehensive Guide to Excel Formulas 1Microsoft Excel Comprehensive Guide to Excel Formulas 1Microsoft Excel Comprehensive Guide to Excel Formulas 1Microsoft Excel Comprehensive Guide to Excel Formulas 1Microsoft Excel Comprehensive Guide to Excel Formulas 1

Hero Xtreme 125R Detailed Analysis: Design, Features, and Performance

बिक्री आंकड़े

Hero Xtreme 125R की अब तक 4,13,470 यूनिट्स बिक चुकी हैं। इसके बावजूद, कई कस्टमर्स को Hero Xtreme 125R की टॉप स्पीड और माइलेज को लेकर कई सवाल हैं। Hero Xtreme 125R Detailed Analysis: Design Hero Xtreme 125R की बिक्री और कस्टमर के सवाल

माइलेज के बारे में जानकारी
ऑनलाइन ऑटोमोबाइल वेबसाइट रिपोर्ट्स के मुताबिक, Hero Xtreme 125R की टॉप स्पीड माइलेज 66 kmpl है। हालांकि, कस्टमर्स से बात करने पर मिली जानकारी के अनुसार, इसका औसत माइलेज 50-70 kmpl के बीच है।

Hero Xtreme 125R की टॉप स्पीड और माइलेज

बाइक की टॉप स्पीड 100–110 km/h के आसपास है। कुछ कस्टमर्स ने इस स्पीड पर माइलेज टेस्ट किया और उन्हें 50 kmpl मिला। वहीं, जिन्होंने 70 km/h पर टेस्ट किया, उन्हें 70 kmpl का माइलेज मिला। Taazatime टीम को एक कस्टमर ने इस टेस्ट का वीडियो फुटेज भी भेजा है।, Hero Xtreme 125R Detailed Analysis: Design, Features

माइलेज की टेस्ट रिपोर्ट

  • Customer No. 1: उत्तर प्रदेश के गोरखपुर जिले के एक कस्टमर ने बताया कि वे रोज़ 10 KM की दूरी 50 km/h की स्पीड से तय करते हैं और 2 लीटर पेट्रोल में एक हफ्ते तक ऑफिस-घर का सफर कर लेते हैं। इसका मतलब है कि उन्हें Hero Xtreme 125R से 70 kmpl का एवरेज मिल रहा है।
  • Customer No. 2: उत्तर प्रदेश के देवरिया जिले के एक कॉलेज स्टूडेंट ने मार्च 2024 में बाइक खरीदी। उन्होंने बताया कि उनकी बाइक 45 से 55 kmpl के बीच माइलेज देती है, जबकि वे आमतौर पर 70-90 km/h की स्पीड से बाइक चलाते हैं।
  • Customer No. 3: उत्तर प्रदेश के सिद्धार्थ नगर जिले के एक कस्टमर ने बताया कि उन्होंने पिछले एक महीने में लॉन्ग ड्राइव की। हाईवे पर उन्हें 60-65 kmpl मिला जब वे 70 km/h की स्पीड से चले। उन्होंने इसे पब्लिक ट्रांसपोर्ट से सस्ता पाया। Hero Xtreme 125R Detailed Analysis: Design, Features

Hero Xtreme 125R माइलेज
कंपनी द्वारा दिए गए माइलेज और बाइक ओनर्स के रिव्यू को देखकर, Taazatime टीम ने निष्कर्ष निकाला है कि कंपनी अपने कस्टमर्स के साथ सही प्रॉमिस कर रही है। कई कस्टमर्स को औसत से अधिक माइलेज मिला है, जबकि कुछ को कम मिला है। बड़े ऑटोमोबाइल पोर्टल्स पर इस बाइक को 4.5 स्टार मिले हैं, जबकि इसके प्रतियोगी Bajaj Pulsar 125 के माइलेज को लेकर सवाल उठे हैं। Hero Xtreme 125R Detailed Analysis: Design, Features

Hero Xtreme 125R: एक समग्र समीक्षा

  • डिजाइन और बिल्ड क्वालिटी
  • Hero Xtreme 125R अपने आकर्षक और स्टाइलिश डिजाइन के लिए जाना जाता है। इसकी मजबूत और स्लीक बॉडी, एग्रेसिव ग्रिल और शार्प लुक इसे युवाओं के बीच खासा लोकप्रिय बनाते हैं। बाइक की बिल्ड क्वालिटी भी प्रभावशाली है, जो इसे लंबे समय तक टिकाऊ बनाती है।Hero Xtreme 125R Detailed Analysis: Design, Features, and Performance

फीचर्स और टेक्नोलॉजी

  • Hero Xtreme 125R में कई आधुनिक फीचर्स शामिल हैं जो इसे एक प्रीमियम अनुभव देते हैं। इसमें फुल-डिजिटल इंस्ट्रूमेंट क्लस्टर, LED हेडलाइट्स, और स्मार्ट राइडिंग मोड्स शामिल हैं। ये फीचर्स न केवल बाइक की लुक को बेहतर बनाते हैं, बल्कि राइडिंग अनुभव को भी ज्यादा सुविधाजनक बनाते हैं। Hero Xtreme 125R Detailed Analysis: Design, Features, and Performance

सस्पेंशन और राइड क्वालिटी

  • बाइक की सस्पेंशन प्रणाली काफी प्रभावशाली है। इसके फ्रंट में टेलिस्कोपिक फोर्क्स और रियर में मोनोशॉक सस्पेंशन दिया गया है, जो बumpy सड़कों पर भी स्मूथ राइडिंग अनुभव प्रदान करता है। इसकी राइड क्वालिटी को लेकर भी कस्टमर्स ने सकारात्मक फीडबैक दिया है, खासकर लंबी यात्रा के दौरान। Hero Xtreme 125R Detailed Analysis: Design, Features, and Performance

सेफ्टी फीचर्स

Hero Xtreme 125R में ब्रेकिंग सिस्टम के लिए डुअल डिस्क ब्रेक्स और डुअल-channel ABS (Anti-lock Braking System) दिया गया है, जो ब्रेकिंग के दौरान अतिरिक्त सुरक्षा प्रदान करता है। यह फीचर खासकर ट्रैफिक और स्लिपरी रोड कंडिशन्स में सुरक्षा सुनिश्चित करता है।

विरोधी मॉडल की तुलना
Hero Xtreme 125R को इसके प्रतिस्पर्धियों जैसे Bajaj Pulsar 125 और TVS Raider 125 के साथ तुलना की जा सकती है। जहां Bajaj Pulsar 125 की माइलेज और परफॉर्मेंस पर कई सवाल उठते हैं, वहीं TVS Raider 125 अपने स्टाइल और फीचर्स के लिए जाना जाता है। Hero Xtreme 125R का माइलेज और राइडिंग कम्फर्ट इसे इन दोनों से अलग बनाते हैं।

यूजर एक्सपीरियंस और सिफारिशें
कस्टमर्स ने Hero Xtreme 125R की डिज़ाइन, परफॉर्मेंस, और माइलेज को लेकर सकारात्मक फीडबैक दिया है। कई यूजर्स ने इसे डेली कम्यूटिंग और लॉन्ग ड्राइव के लिए एक बेहतरीन विकल्प माना है। यदि आप एक रिलीएबल और स्टाइलिश 125cc बाइक की तलाश में हैं, तो Hero Xtreme 125R एक बढ़िया विकल्प हो सकता है। Hero Xtreme 125R Detailed Analysis: Design, Features

निष्कर्ष
Hero Xtreme 125R की मौजूदा रिपोर्ट्स और कस्टमर रिव्यूज से स्पष्ट है कि यह बाइक अपने सेगमेंट में एक मजबूत दावेदार है। इसकी बेहतरीन माइलेज, स्टाइलिश डिज़ाइन, और प्रभावशाली फीचर्स इसे बाजार में एक आकर्षक विकल्प बनाते हैं।

Hero Xtreme 125R Detailed Analysis: Design, Features, and Performance

इस अतिरिक्त कंटेंट से आपके पाठकों को Hero Xtreme 125R के बारे में और अधिक जानकारी मिलेगी और वे बेहतर निर्णय ले सकेंगे। Hero Xtreme 125R Detailed Analysis: Design, Features

Managing Reorder Levels in Tally Prime

Managing inventory is critical for businesses to ensure they meet customer demand without overstocking or running out of products. Reorder levels in Tally Prime help businesses automate this process by setting predefined stock levels that trigger reorder actions when the inventory falls below a specific threshold.Managing Reorder Levels in Tally Prime This feature ensures that businesses maintain optimal stock levels, preventing stockouts and excess inventory.


1. What is Reorder Level in Tally Prime?

A Reorder Level is a pre-set stock quantity that determines when a new order should be placed for replenishment. When the available stock reaches or falls below this level, it signals the need to reorder. Tally Prime automates this process by allowing users to set reorder levels for individual items in their inventory.


2. Importance of Reorder Levels

Reorder levels are essential for businesses for several reasons:

  • Avoiding Stockouts: Reorder levels prevent running out of essential items, ensuring the business can meet customer demand without delay.
  • Optimizing Inventory: By keeping track of stock levels, businesses can avoid overstocking, which ties up capital and increases storage costs.
  • Efficiency: Automating reordering saves time by reducing manual inventory monitoring.
  • Improved Cash Flow: Businesses can manage their cash flow better by maintaining optimal stock levels and avoiding excess investment in inventory.

3. How to Set Reorder Levels in Tally Prime

Setting reorder levels in Tally Prime is straightforward. Follow these steps:

Step 1: Enable Reorder Levels

  1. Go to Gateway of Tally > F11: Features > Inventory Features.
  2. Set Use Reorder Levels to Yes.
  3. Accept the settings by pressing Enter.

Step 2: Set Reorder Levels for Stock Items

  1. Navigate to Gateway of Tally > Inventory Info > Stock Items.
  2. Select the stock item for which you want to set the reorder level.
  3. Press Alt+E to enter the Reorder Level section.
  4. Enter the Reorder Quantity for the item (the minimum quantity of stock that should trigger a reorder).
  5. Optionally, enter the Minimum Order Quantity, which is the amount you want to order each time the reorder level is reached.
  6. Save the changes by pressing Enter.

4. Example of Setting Reorder Levels

Let’s assume you own a retail business and sell mobile phones. You want to ensure that you always have at least 20 units of a specific phone model in stock. However, you want to reorder when the stock drops to 30 units to avoid running out.

  • Reorder Level: 30 units
  • Minimum Order Quantity: 50 units (this means whenever you reorder, you will order at least 50 units).

Once the stock of this phone model drops to 30 units, Tally Prime will alert you to reorder 50 units to ensure that your inventory is replenished on time.


5. Viewing Reorder Levels in Tally Prime

Tally Prime allows you to easily track and view reorder levels to manage your inventory efficiently.

Steps to View Reorder Status:

  1. Go to Gateway of Tally > Display > Inventory Books > Reorder Status.
  2. Select the relevant stock group or item.
  3. Tally Prime will display a list of items with their reorder levels, current stock quantities, and suggested reorder quantities.

This report helps you stay on top of your inventory levels and ensures timely replenishment of stock.


6. Benefits of Managing Reorder Levels in Tally Prime

A. Prevents Stockouts

By setting reorder levels, you ensure that critical items are always available in your inventory. This helps avoid delays in fulfilling customer orders and keeps your operations running smoothly.

B. Reduces Excess Inventory

Reorder levels ensure that you only order what you need, reducing the risk of overstocking. This helps in better utilization of storage space and minimizes carrying costs.

C. Automated Alerts

With Tally Prime, you receive automated alerts when the stock falls below the reorder level. This eliminates the need for constant manual monitoring of inventory.

D. Efficient Supply Chain Management

By optimizing reorder levels, you can manage supplier relationships more efficiently, placing timely orders and negotiating better terms for bulk purchases.

E. Enhanced Cash Flow

Maintaining optimal stock levels through reorder management frees up cash that would otherwise be tied up in excess inventory. This improves the overall financial health of your business.


7. Best Practices for Setting Reorder Levels

To make the most of reorder levels in Tally Prime, consider the following best practices:

Before setting reorder levels, analyze historical sales data to understand the demand patterns for your products. This will help you set accurate reorder levels based on actual demand.

B. Adjust for Seasonality

If your business experiences seasonal fluctuations in sales, adjust reorder levels accordingly. For example, you may need to increase reorder levels for certain products during peak seasons and lower them during off-seasons.

C. Regularly Review Reorder Levels

It’s essential to periodically review and update your reorder levels based on changes in demand, supplier lead times, or changes in your product range.

D. Coordinate with Suppliers

Ensure that your suppliers can meet your reorder quantities in a timely manner. Establish lead times for each supplier and incorporate them into your reorder planning.


8. Reports for Reorder Levels

Tally Prime provides detailed reports to help you track and manage your reorder levels effectively. These reports offer insights into stock status, reorder quantities, and current stock levels.

Reorder Level Reports in Tally Prime:

  1. Reorder Status Report: Shows a list of stock items, their reorder levels, current stock, and suggested reorder quantities.
  2. Stock Summary Report: Gives an overview of all stock items, including current stock, available quantities, and pending orders.
  3. Reorder Action Report: Provides actionable insights on which stock items need to be reordered based on current stock and reorder levels.

These reports allow you to monitor your inventory closely and ensure that stock levels are maintained without overordering or running out of essential items.


9. Conclusion

Managing reorder levels in Tally Prime is an efficient way to maintain optimal stock levels, prevent stockouts, and reduce excess inventory. By automating the reorder process and leveraging real-time reports, businesses can ensure they always have the right amount of stock on hand. This not only enhances operational efficiency but also improves cash flow and customer satisfaction.

Using the reorder level feature in Tally Prime helps businesses manage their inventory in a more strategic and cost-effective way, making it a valuable tool for any business that deals with physical products.


Managing Reorder Levels in Tally Prime

  1. #ReorderLevels
  2. #TallyPrimeInventory
  3. #InventoryManagement
  4. #StockReorder
  5. #InventoryOptimization
  6. #TallyPrimeStockControl
  7. #AutomatedReorder
  8. #InventoryEfficiency
  9. #StockMonitoring
  10. #ReorderAlertsTallyPrime

Sora by OpenAI: Full Details on How it Works and Its Role in AI

Sora is a product or project by OpenAI, designed to provide users with Sora by OpenAI seamless access to advanced artificial intelligence (AI) capabilities. Although specifics on “Sora by OpenAI” are not publicly detailed as of the latest information, OpenAI’s broader approach to AI and how its products operate can be extrapolated based on its existing systems such as GPT-3, GPT-4, Codex, and other AI solutions.

This article will explore how OpenAI’s AI technology, including hypothetical or future products like Sora, works, its applications, the company’s philosophy on AI, and its mission to build friendly AI for various industries.


1. Overview of OpenAI

OpenAI is a cutting-edge research organization and AI company founded in December 2015 by Elon Musk, Sam Altman, and others. Its mission is to ensure that artificial general intelligence (AGI) benefits all of humanity. OpenAI creates and promotes friendly AI through both commercial and research-driven efforts.

The organization is known for developing powerful language models, AI-driven tools, and innovative products such as ChatGPT, Codex (for coding), and DALL·E (for image generation). OpenAI’s products are built on deep learning, natural language processing (NLP), machine learning (ML), and neural networks that allow computers to understand and generate human-like text or even create images from text prompts.


2. What Could Sora by OpenAI Be?

While “Sora by OpenAI” has no explicit public documentation, based on OpenAI’s history of products, Sora could potentially represent:

  • A new AI-driven application or interface designed to offer users advanced capabilities, possibly integrating features like conversational AI, decision-making algorithms, or generative content systems.
  • A specific platform for businesses or consumers where AI-driven insights, automation, or creative generation tools are readily available.
  • A tool for developers or enterprises to implement AI seamlessly in their workflows, perhaps focused on specific sectors like healthcare, finance, or customer service.

Given OpenAI’s past focus on accessible AI for developers and the public, Sora could be a tool that democratizes AI capabilities further, making it easier for non-experts to integrate AI solutions into their businesses.


3. How OpenAI’s AI Technology Works

To understand how Sora by OpenAI might function, it’s essential to know the principles underlying OpenAI’s technology:

A. Neural Networks

OpenAI’s AI systems are built on neural networks, which are computer systems modeled on the human brain’s neurons. These networks allow AI models to learn from data, detect patterns, and make decisions based on that data. The architecture behind OpenAI models like GPT-4 involves transformer networks, a specific type of neural network optimized for processing sequential data like language.

B. Natural Language Processing (NLP)

A core strength of OpenAI’s models is natural language processing (NLP). NLP is the technology that allows AI to understand, generate, and interact using human language. Models like GPT-4 are trained on vast datasets containing text from books, websites, research papers, and other sources. The models then learn patterns of grammar, facts, reasoning, and creativity.

C. Generative Pre-trained Transformers (GPT)

GPT models are the backbone of OpenAI’s language products. GPT (Generative Pre-trained Transformer) is designed to generate human-like responses based on text prompts. It works in three stages:

  • Pre-training: The model learns from massive datasets, predicting the next word in a sequence of words, which allows it to learn grammar, facts, and reasoning patterns.
  • Fine-tuning: The model is refined with smaller, curated datasets, often incorporating feedback to make it more accurate or aligned with user needs.
  • Deployment: Once trained, the model can be integrated into applications like Sora, generating responses, creating content, or assisting in decision-making processes.

D. Reinforcement Learning from Human Feedback (RLHF)

OpenAI employs a method called Reinforcement Learning from Human Feedback (RLHF) to improve the performance of its models. In RLHF, human trainers rank or provide feedback on AI outputs, which the AI then uses to adjust and improve its results. This process ensures that AI-generated content is more aligned with human values and expectations.


4. How Sora by OpenAI Might Be Used

If Sora by OpenAI follows the trend of previous OpenAI products, it might serve a range of purposes, including but not limited to:

A. Customer Service Automation

Sora could be used to automate customer service interactions, handling common queries and even complex decision-making processes. By integrating AI-powered chatbots, companies could improve response times, reduce costs, and provide 24/7 service.

B. Content Creation

OpenAI’s GPT models have already been used to generate articles, blogs, reports, and even creative writing like poems or stories. Sora might enhance or simplify these processes, offering businesses or individuals tools to automatically create content for websites, marketing, or social media.

C. Business Insights & Analytics

Sora could provide AI-driven insights into business data, automatically generating reports, detecting patterns in sales or customer behavior, and even suggesting strategies for growth or risk mitigation.

D. Personal Assistants and Scheduling

Sora might serve as a highly advanced AI assistant that integrates with calendars, emails, and project management tools to optimize workflows. It could schedule meetings, send reminders, manage deadlines, and assist in communication across teams.

E. AI for Developers

Like OpenAI’s Codex, Sora could be targeted toward developers, providing an intuitive interface for integrating AI into applications. Developers might use it to enhance coding efficiency, automate debugging, or even write code based on natural language descriptions of what they want.


5. OpenAI’s Commitment to Safety and Ethics

OpenAI is focused on ensuring that AI is safe, aligned with human values, and beneficial for all humanity. The company follows strict guidelines and conducts continuous research on AI alignment, governance, and ethical implications.

  • Transparency: OpenAI shares its research and findings with the public, including information on safety concerns and bias mitigation.
  • Partnerships and Collaborations: OpenAI collaborates with other research bodies and governments to establish global guidelines for AI use.
  • Limitations and Safeguards: Products like Sora, following OpenAI’s established guidelines, would likely have built-in safeguards to avoid harmful or unintended consequences. This could include limiting certain features, placing human oversight in decision-making, or restricting sensitive data processing.

6. The Future of Sora by OpenAI

The future of Sora by OpenAI could involve greater integration of AI into everyday business processes, creative work, and personal life. With OpenAI’s focus on democratizing AI, Sora could bring powerful tools to people with limited technical expertise, allowing more industries and individuals to benefit from AI advancements.

Some potential advancements might include:

  • Voice Interfaces: Integration with voice-activated systems for even more natural interactions.
  • AI in Education: Using AI like Sora in classrooms to enhance learning through personalized tutoring.
  • Healthcare AI: AI-driven solutions for patient data analysis, diagnostics, and treatment recommendations.

Conclusion

While Sora by OpenAI may not have specific public documentation at this time, based on OpenAI’s existing technologies, we can infer that Sora could be a significant AI tool providing businesses, developers, and individuals with the power of AI in an accessible format. Built on OpenAI’s proven technologies like GPT and Codex, and guided by its mission to ensure AI benefits humanity, Sora represents a step forward in the practical applications of artificial intelligence in the real world.

Tally Prime Notes

Tally Prime is a comprehensive business management software for accounting, inventory, Tally Prime Notes payroll, and more. Here are detailed notes on the key features and functionalities of Tally Prime to help you understand its operations:

1. Introduction to Tally Prime

Tally Prime is the latest version of Tally, designed to simplify accounting processes for businesses. It is user-friendly and helps in managing various aspects like accounting, inventory management, tax filing, and payroll. It offers extensive features and reporting capabilities, making it ideal for small and medium enterprises.

2. Key Features of Tally Prime

Tally Prime is equipped with multiple features to help manage financial tasks efficiently:

  • Accounting Management: Helps in managing ledgers, creating and maintaining voucher entries, and handling all accounting-related transactions.
  • Inventory Management: Allows tracking inventory levels, managing stock, and organizing warehouses. It also includes tools for inventory valuation, stock movement, and reordering levels.
  • GST and Taxation Compliance: Enables accurate calculation of GST, VAT, TDS, TCS, and other statutory taxes with easy return filing.
  • Multi-User and Multi-Language Support: Facilitates multi-user access and supports various languages, enabling businesses in different regions to use Tally Prime.
  • Payroll Management: Helps manage employee salaries, benefits, deductions, and attendance records.
  • Banking and Financial Transactions: Seamlessly integrates with banks for automated reconciliation and digital payment processing.
  • Reporting: Provides insightful reports for accounting, inventory, and taxation to help businesses make informed decisions.

3. Tally Prime Interface Overview

Tally Prime has a simplified and intuitive interface for easier navigation:

  • Gateway of Tally: The first screen that provides access to all features and modules of the software.
  • Menu Bar: Displays available options for managing accounting, inventory, and other business functions.
  • Buttons Panel: Contains quick access buttons for various tasks such as company selection, creating vouchers, and report generation.

4. Setting Up Tally Prime

Before using Tally Prime for accounting, a few setup steps need to be completed:

  • Company Creation: Create a new company by entering basic information such as the company name, financial year, currency, and statutory details like GST.
  • Chart of Accounts Setup: Define the chart of accounts, including ledger heads for assets, liabilities, income, and expenses.
  • Inventory Setup: Create stock groups, stock items, and units of measure for inventory management.
  • Tax Configuration: Configure GST, TDS, and other tax settings based on the nature of the business.

5. Accounting in Tally Prime

The core function of Tally Prime is managing the accounting process. Below are the steps for key accounting tasks:

  • Creating Ledgers: Ledgers are the heart of accounting in Tally Prime. Ledgers for sales, purchases, bank accounts, creditors, and debtors are created under predefined groups such as assets, liabilities, income, and expenses.
  • Voucher Entry: Vouchers record all business transactions. Common types of vouchers include:
  • Sales Voucher (F8): Used for recording sales transactions.
  • Purchase Voucher (F9): Used for recording purchase transactions.
  • Payment Voucher (F5): Records payments made by the business.
  • Receipt Voucher (F6): Records money received.
  • Journal Voucher (F7): Used for adjustments such as depreciation or provisions.

6. Inventory Management in Tally Prime

Tally Prime offers robust inventory management to keep track of stock movements and ensure the availability of inventory:

  • Stock Groups: Categorize inventory items based on similar characteristics.
  • Stock Items: Represent individual goods or products maintained in inventory.
  • Godowns/Warehouses: Manage the storage locations where inventory is housed.
  • Inventory Vouchers: Used to record inventory-related transactions such as stock receipts, stock transfers, and sales. Tally Prime Notes

7. Taxation and GST in Tally Prime

Tally Prime is fully compliant with India’s GST regime, allowing for smooth management of taxation:

  • GST Setup: Configure GST in the company by entering GSTIN, tax rate details, and defining tax heads for different products and services. Tally Prime Notes
  • Recording GST Transactions: Every sale or purchase transaction can be recorded with GST details, ensuring accurate tax calculation. Tally Prime Notes
  • GST Return Filing: Tally Prime helps in generating GSTR-1, GSTR-3B, and other GST returns, making compliance easy. Tally Prime Notes

8. Payroll Management in Tally Prime

For businesses managing payroll, Tally Prime offers features to handle salaries, employee benefits, and statutory deductions like PF and ESI:

  • Employee Creation: Add employee details such as name, designation, and salary structure. Tally Prime Notes
  • Payroll Vouchers: Record payroll-related transactions such as salary payments, deductions, and bonuses.
  • Payroll Reports: Generate reports like pay slips, attendance registers, and statutory deductions for filing with authorities. Tally Prime Notes

9. Banking in Tally Prime

Tally Prime simplifies banking operations by integrating them with accounting records:

  • Bank Reconciliation: Tally Prime allows you to reconcile bank statements automatically by importing bank statements.
  • Cheque Management: Manage cheque payments and printing of cheques directly from the software.
  • Digital Payments: Integration with e-banking for faster payments and transactions.

10. Reporting in Tally Prime

Tally Prime provides extensive reporting features for various business functions:

  • Financial Reports: Generate balance sheets, profit and loss statements, and cash flow reports.
  • Inventory Reports: View stock summary, stock aging analysis, and movement analysis reports. Tally Prime Notes
  • Tax Reports: Get GST and TDS reports for tax filings and compliance.
  • Custom Reports: Users can customize reports based on specific business needs.

11. Shortcuts in Tally Prime

Tally Prime offers many keyboard shortcuts for faster navigation and operations:

  • Alt + F1: To view detailed mode of reports.
  • Ctrl + A: Accept a screen or complete an entry.
  • F11: Company features configuration. Tally Prime Notes
  • F12: Configure settings for data entry, inventory, and vouchers.
  • Alt + F8: To cancel a voucher or report. Tally Prime Notes

12. Conclusion

Tally Prime is an all-in-one solution for managing accounting, inventory, and compliance needs for businesses of all sizes. Its user-friendly interface, robust features, and compliance capabilities make it a trusted choice for enterprises in India and globally. Understanding its core functionalities like accounting, inventory management, GST compliance, payroll, and reporting will enable users to harness the full potential of Tally Prime effectively Tally Prime Notes.

Tally Prime Notes

Creating Groups in Tally Prime Notes

In Tally Prime, groups are used to classify and organize ledger accounts, helping to maintain a structured and efficient accounting system.Creating Groups in Tally Prime Groups categorize ledgers into various heads, such as expenses, incomes, assets, and liabilities, ensuring that transactions are recorded under the correct heads for proper reporting. Grouping plays a vital role in the preparation of financial statements like balance sheets and profit and loss accounts.


What is a Group in Tally Prime?

A group is a collection of ledger accounts that share similar characteristics. For instance, all Sales Accounts can be grouped under a single Sales Group. Similarly, Sundry Creditors (accounts payable) can be grouped together to track money owed to suppliers. Tally Prime comes with several predefined groups that help categorize common business transactions, but you can also create custom groups to meet specific business requirements.


Predefined Groups in Tally Prime

Tally Prime provides several predefined groups to get you started. These are grouped into two categories:

1. Primary Groups:

These include fundamental heads like Capital Account, Loans, Fixed Assets, and Current Liabilities.

2. Subgroups:

These fall under the primary groups. For example, under Current Liabilities, you may have subgroups like Sundry Creditors or Duties & Taxes.

Some of the commonly used predefined groups include:

  • Capital Account: Represents the capital or owner’s equity in the business.
  • Loans (Liabilities): Tracks any loans taken by the business.
  • Sundry Debtors: Tracks receivables, i.e., money owed by customers.
  • Sundry Creditors: Tracks payables, i.e., money the business owes to suppliers.
  • Sales Accounts: Tracks revenue generated from sales.
  • Purchase Accounts: Tracks purchases made by the business.
  • Direct Incomes: Incomes directly related to the primary business activities.
  • Indirect Incomes: Other income sources such as interest earned.

Benefits of Creating Custom Groups in Tally Prime

While predefined groups cover the essential accounting needs, businesses often require custom groups to manage specific activities or transactions. Creating custom groups allows for:

  • Better Organization: Classify transactions into more detailed categories to match your business needs.
  • Easier Analysis: Grouping similar ledger accounts enables quick analysis of specific areas of your business.
  • Improved Financial Reporting: Custom groups make financial statements more comprehensive and tailored to your business.
  • Flexible Accounting: Customize how you track revenue, expenses, or assets based on unique business activities.

Steps to Create Groups in Tally Prime

Here’s a step-by-step guide to creating custom groups in Tally Prime:

1. Access the Group Creation Screen

  • From the Gateway of Tally, go to Accounts Info.
  • Select Groups from the menu.
  • Choose Create to start creating a new group.

2. Enter Group Name

  • Provide a descriptive name for the group. For example, “Office Expenses” or “Marketing Income.”

3. Specify the Parent Group

  • Select the Parent Group under which this new group will fall. For instance, if you’re creating a new income group, it might fall under Indirect Incomes or Direct Incomes.
  • If the group is a primary group, you can choose to have no parent.

4. Nature of Group

  • Specify whether the group will behave like a revenue account (income/expense) or an asset/liability account (balance sheet).

5. Set Group to Subgroup or Primary

  • Choose whether the new group should be a subgroup of an existing group or a primary group.

6. Accept the Group

  • Once you’ve filled in all the necessary details, press Enter to accept and save the group.

Modifying a Group

You can modify existing groups at any time to update details such as names, parent groups, or settings. Here’s how you can modify a group:

  1. Go to Gateway of TallyAccounts InfoGroupsAlter.
  2. Select the group you wish to modify.
  3. Make necessary changes and press Enter to save.

Deleting a Group

If a group is no longer needed and has no associated transactions, it can be deleted. To delete a group, follow these steps:

  1. Go to Gateway of TallyAccounts InfoGroupsAlter.
  2. Select the group to be deleted.
  3. Press Alt + D to delete the group.

Note: A group with associated transactions cannot be deleted.


Example of Creating a Custom Group

Let’s say your business wants to track Travel Expenses separately from other operational expenses. Here’s how you can create a group for it:

  1. Go to Gateway of TallyAccounts InfoGroupsCreate.
  2. Enter Group Name: “Travel Expenses”.
  3. Select Parent Group: Choose Indirect Expenses as the parent group.
  4. Set Group Type: Leave it as a Subgroup under Indirect Expenses.
  5. Accept the group and save it.

Now, every time you create a ledger related to travel expenses, you can group it under this new custom group.


Commonly Used Groups in Tally Prime

Some common groups businesses often create for better tracking include:

  1. Office Expenses: Tracks all expenses related to office operations like utilities, rent, or office supplies.
  2. Advertising Expenses: Tracks all spending related to marketing and promotional activities.
  3. Loans Taken: Tracks liabilities related to loans from banks or other lenders.
  4. Employee Salaries: Grouping salary-related ledgers for payroll expenses.
  5. Maintenance Expenses: Tracks costs related to maintaining assets like office equipment or vehicles.

Key Points to Remember

  • Organized Accounting: Grouping ledgers improves the overall organization of financial records.
  • Detailed Financial Reports: Custom groups allow businesses to generate detailed reports specific to their operational needs.
  • Flexible Customization: Tally Prime’s flexibility in creating groups allows it to adapt to any business type or size.

Conclusion

Creating groups in Tally Prime is an essential step in maintaining a well-structured accounting system. Whether using predefined groups or creating custom ones, grouping helps to keep financial data organized, enhances reporting accuracy, and simplifies the analysis of business performance. Tally Prime’s group creation feature is user-friendly and flexible, enabling businesses to adapt their accounting systems to their specific requirements.


Group Creation in Tally Prime:

  1. How to Create Groups in Tally Prime
  2. Tally Prime Group Creation Guide
  3. Grouping Ledgers in Tally Prime
  4. Create Custom Groups in Tally Prime
  5. Modifying Groups in Tally
  6. Deleting Groups in Tally Prime
  7. Best Practices for Grouping Ledgers in Tally
  8. How to Organize Ledgers in Tally
  9. Tally Prime Group Management
  10. Grouping Accounts in Tally Explained
  11. Tally Prime Custom Group Setup
  12. Creating Financial Groups in Tally
  13. Predefined Groups in Tally Prime
  14. Tally Prime Ledger Grouping Tips
  15. Accounting Group Creation in Tally Prime

These tags will help in improving SEO and visibility on search engines, leading to better ranking for topics related to Tally Prime group creation.

तवा नहीं मिला तो चाट वाले भैया अपनाया गजब का देसी जुगाड़, वीडियो देख लोग बोले ‘इंडिया इज नॉट फॉर बिगनर्स’

हाल ही में एक वीडियो सोशल मीडिया पर खूब वायरल हो रहा है, जिसमें एक चाट वाले भैया ने तवा न मिलने पर एक शानदार देसी जुगाड़ का इस्तेमाल किया। तवा नहीं मिला तो चाट वाले भैया अपनाया गजब का देसी जुगाड़ यह वीडियो भारतीय जुगाड़ संस्कृति का जीता-जागता उदाहरण बन चुका है, और लोग इसे देखकर भारतीयों की समस्या-समाधान की क्षमता की तारीफ कर रहे हैं। इस वीडियो को देखकर लोगों ने कहा, “इंडिया इज नॉट फॉर बिगनर्स” यानी भारत शुरुआती लोगों के लिए नहीं है, क्योंकि यहां के लोग हर समस्या का अनोखा हल निकाल लेते हैं। desi video तवा नहीं मिला तो चाट वाले भैया अपनाया गजब का देसी जुगाड़,

घटना का विवरण:

इस वायरल वीडियो में एक चाट वाला, जो आमतौर पर तवे पर चाट बनाता है, तवे की अनुपलब्धता के कारण एक बाल्टी का उपयोग करता दिखाई दे रहा है। वह बाल्टी को उल्टा रखकर उसका निचला हिस्सा तवे की तरह गर्म करता है और उसी पर चाट बनाना शुरू कर देता है। इस अनोखे जुगाड़ से वह अपनी चाट तैयार कर रहा है और ग्राहकों को सर्व कर रहा है, मानो तवा की कमी से उसे कोई फर्क ही नहीं पड़ा। तवा नहीं मिला तो चाट वाले भैया अपनाया गजब का देसी जुगाड़,

सोशल मीडिया पर प्रतिक्रिया:

इस वीडियो को देखकर लोग अलग-अलग प्रतिक्रियाएं दे रहे हैं। कुछ लोग चाट वाले की तारीफ कर रहे हैं कि कैसे उसने बिना तवे के भी काम को रोका नहीं और एक सस्ते जुगाड़ का सहारा लिया। वहीं, कुछ लोग इस जुगाड़ को देखकर हंसते हुए कह रहे हैं कि भारतीयों की यह क्षमता दुनिया में किसी और के पास नहीं हो सकती। कई लोग कमेंट कर रहे हैं कि “इंडिया जुगाड़ू लोगों का देश है।” तवा नहीं मिला तो चाट वाले भैया अपनाया गजब का देसी जुगाड़,

ट्विटर, इंस्टाग्राम और फेसबुक पर इस वीडियो को हजारों बार शेयर किया जा चुका है, और यह एक मजेदार चर्चा का विषय बन चुका है। लोग कह रहे हैं कि भारतीय अपने अनोखे तरीके से हर मुश्किल को आसान बना देते हैं। इस घटना ने न केवल हंसी का माहौल पैदा किया, बल्कि भारतीयों की क्रिएटिविटी और जुगाड़ की भावना को भी उजागर किया। तवा नहीं मिला तो चाट वाले भैया अपनाया गजब का देसी जुगाड़,

जुगाड़ की भारतीय संस्कृति:

भारत में जुगाड़ का मतलब सिर्फ अस्थायी समाधान नहीं है, बल्कि यह एक ऐसी क्रिएटिव अप्रोच है जो सीमित संसाधनों में भी काम को बेहतर तरीके से पूरा करने की क्षमता को दिखाती है। भारतीय समाज में जुगाड़ की यह सोच लंबे समय से चली आ रही है। चाहे वो गांवों में किसानों द्वारा अपने खेतों में नए तरीके अपनाना हो या शहरी क्षेत्रों में रोजमर्रा के छोटे-मोटे कामों में आसान तरीके निकालना—भारत में जुगाड़ एक संस्कृति बन चुकी है। तवा नहीं मिला तो चाट वाले भैया अपनाया गजब का देसी जुगाड़,

तवा नहीं मिला तो चाट वाले भैया अपनाया गजब का देसी जुगाड़

चाट वाले भैया का यह जुगाड़ न केवल एक उदाहरण है कि कैसे भारतीय किसी भी स्थिति में भी काम रोकते नहीं हैं, बल्कि यह भी दर्शाता है कि संसाधनों की कमी भी उनके आत्मविश्वास और क्रिएटिविटी को कम नहीं कर सकती। तवा न मिलने पर बाल्टी का इस्तेमाल कर चाट बनाने का यह अनोखा तरीका साबित करता है कि भारतीय अपने काम को कैसे भी जारी रखते हैं और किसी भी समस्या का समाधान निकाल लेते हैं।

इस समय इंटरनेट पर एक वीडियो तेजी से वायरल हो रहा है, जिसमें एक चाट वाले भैया ने तवा न मिलने पर देसी जुगाड़ का बेहतरीन उदाहरण पेश किया है। इस वीडियो में, चाट वाले भैया ने तवे की जगह एक उल्टी बाल्टी का इस्तेमाल करके अपनी चाट बनाना शुरू कर दिया। इस देसी जुगाड़ को देखकर लोग हैरान रह गए और सोशल मीडिया पर उनकी तारीफों के पुल बांधने लगे।

Viral video desi : तवा नहीं मिला तो DTH की छतरी पर बना दी पाव भाजी, जुगाड़ देख भौचक्के रह गए लोग

वीडियो में देखा जा सकता है कि कैसे चाट वाले ने तवे की कमी को नजरअंदाज करते हुए बाल्टी के उल्टे हिस्से पर चाट पकाना शुरू किया और ग्राहकों को सर्व कर दिया। इस घटना ने भारतीयों के जुगाड़ू नेचर को फिर से साबित कर दिया, जहां लोग किसी भी समस्या का हल निकालने में माहिर होते हैं।

इंटरनेट पर तरह-तरह के वीडियोज आजकल वायरल हो रहे हैं. इन दिनों एक ऐसे देसी जुगाड़ का वीडियो इंटरनेट पर वायरल है जिसे देख लोगों का दिमाग चकरा रहा है. दरअसल, ‘kushka.hakla’ नाम के अकाउंट से शेयर  की गई एक वीडियो में पाव भाजी तवे पर नहीं बल्कि DTH की छतरी पर बनाई जा रही है. इस वीडियो के इंटरनेट पर आने के बाद लोग मजे ले रहे हैं. 

DTH पर बन रहा पाव भाजी, देखें वीडियो

वायरल वीडियो में एक शख्स डीटीएच पर पाव भाजी बनाता दिख रहा है. इस वीडियो को देख पाव भाजी लवर्स को धक्का सा जरूर लगा है. वीडियो देखने के बाद लोग अपना माथा पीटने लगे और सोशल मीडिया पर तरह-तरह के कमेंट्स करने लगे. आप भी देखें वीडियो.  तवा नहीं मिला तो चाट वाले भैया अपनाया गजब का देसी जुगाड़, वीडियो देख लोग बोले ‘इंडिया इज नॉट फॉर बिगनर्स’

लोग इस वीडियो को देखकर हंसते-हंसते लोटपोट हो रहे हैं और कह रहे हैं, “इंडिया इज नॉट फॉर बिगनर्स।” भारतीयों की क्रिएटिविटी और किसी भी समस्या का समाधान खोजने की क्षमता को देखकर दुनियाभर के लोग प्रभावित हो रहे हैं। यह वीडियो न सिर्फ मनोरंजन का साधन बना, बल्कि भारतीय जुगाड़ की मिसाल भी कायम कर दी। तवा नहीं मिला तो चाट वाले भैया अपनाया गजब का देसी जुगाड़, वीडियो देख लोग बोले ‘इंडिया इज नॉट फॉर बिगनर्स’

Purchase and Sales Order Processing in Tally Prime

Order processing is an essential part of any business, helping in managing the flow of goods between suppliers and customers.Purchase and Sales Order Processing in Tally Prime Tally Prime simplifies this process by offering robust tools for both Purchase Order and Sales Order management. With Tally Prime, businesses can automate and streamline order processing to ensure accurate record-keeping, better inventory control, and improved customer satisfaction.


1. What is Order Processing in Tally Prime?

Order processing in Tally Prime refers to managing purchase and sales orders from creation to fulfillment. It involves recording orders, managing inventory, processing payments, and generating invoices. The entire process is designed to help businesses track their orders efficiently and ensure smooth operations.


2. Purchase Order Processing in Tally Prime

A Purchase Order (PO) is a formal document issued by the buyer to the supplier, detailing the products, quantity, and agreed prices for items the buyer wishes to purchase. In Tally Prime, purchase order processing helps manage procurement activities.

Steps to Create a Purchase Order in Tally Prime:

Step 1: Enable Purchase Order Processing

  1. Go to Gateway of Tally > F11: Features > Inventory Features.
  2. Set Use Purchase Order Processing to Yes.
  3. Accept the configuration.

Step 2: Create Purchase Orders

  1. Go to Gateway of Tally > Vouchers > F9: Purchase.
  2. Select Purchase Order as the voucher type.
  3. In the voucher screen, select the supplier’s name from the list or create a new one.
  4. Enter the order details, including:
  • Items: The products you wish to purchase.
  • Quantities: The quantity of each item.
  • Rates: The price per unit of each item.
  • Due Date: The expected delivery date for the order.
  1. Once the details are entered, save the purchase order by pressing Enter.

3. Sales Order Processing in Tally Prime

A Sales Order (SO) is a confirmation document sent by the seller to the customer before the actual sale of goods. It specifies the products and services the customer intends to purchase, along with the price, quantity, and terms. Tally Prime simplifies sales order management by helping businesses track customer orders effectively.

Steps to Create a Sales Order in Tally Prime:

Step 1: Enable Sales Order Processing

  1. Go to Gateway of Tally > F11: Features > Inventory Features.
  2. Set Use Sales Order Processing to Yes.
  3. Accept the configuration.

Step 2: Create Sales Orders

  1. Go to Gateway of Tally > Vouchers > F8: Sales.
  2. Select Sales Order as the voucher type.
  3. Choose the customer’s name from the list or create a new one.
  4. Enter the order details such as:
  • Stock Items: The products the customer is ordering.
  • Quantities: The quantity ordered by the customer.
  • Rates: The agreed price per unit.
  • Delivery Date: The expected date for the delivery.
  1. After entering all the details, save the sales order by pressing Enter.

4. Processing Purchase and Sales Orders

Once purchase and sales orders are created, Tally Prime allows you to convert these orders into purchase invoices and sales invoices seamlessly. This ensures that inventory is automatically adjusted and accounts are updated in real-time.

Steps to Convert Purchase Orders into Purchase Invoices:

  1. Go to Gateway of Tally > Vouchers > F9: Purchase.
  2. Select the Purchase Invoice voucher type.
  3. In the voucher screen, select the supplier.
  4. Tally Prime will prompt you to link the Purchase Order. Select the relevant order from the list.
  5. Enter additional details if needed and save the purchase invoice.

Steps to Convert Sales Orders into Sales Invoices:

  1. Go to Gateway of Tally > Vouchers > F8: Sales.
  2. Select the Sales Invoice voucher type.
  3. In the voucher screen, select the customer.
  4. Link the Sales Order to the Sales Invoice from the list.
  5. Enter additional details, if necessary, and save the invoice.

5. Benefits of Order Processing in Tally Prime

A. Streamlined Workflow

Tally Prime automates the order processing workflow, making it easier to manage purchase and sales orders from creation to invoicing. This reduces manual effort and eliminates errors.

B. Real-Time Inventory Updates

When a purchase or sales order is processed, inventory levels are updated automatically. This ensures accurate stock management and helps avoid over-ordering or stockouts.

C. Improved Cash Flow Management

By tracking purchase and sales orders, businesses can better manage their cash flow, ensuring timely payments to suppliers and efficient invoicing for customers.

D. Enhanced Customer Satisfaction

With accurate order tracking and timely delivery, businesses can improve their customer satisfaction levels, leading to repeat orders and positive customer relationships.

E. GST Compliance

Tally Prime ensures that all orders are processed in compliance with the GST regulations, simplifying tax filing and ensuring the correct GST amounts are applied to all invoices.


6. Reports for Purchase and Sales Orders

Tally Prime provides comprehensive reports to help businesses track the status of their purchase and sales orders. These reports offer insights into pending orders, fulfilled orders, and order-wise stock movement.

Key Reports for Purchase and Sales Orders:

  1. Pending Purchase Orders: Lists all the orders that are yet to be fulfilled by suppliers.
  2. Pending Sales Orders: Displays customer orders that are pending fulfillment.
  3. Order-Wise Stock Report: Shows the movement of stock based on purchase and sales orders.
  4. Order Register: Provides a detailed view of all purchase and sales orders created within a specified period.

These reports enable businesses to stay on top of their order management, ensuring that orders are fulfilled on time and stock levels are maintained.


7. Conclusion

Purchase and sales order processing is a vital function for any business, and Tally Prime makes it efficient and seamless. By automating the creation, processing, and conversion of orders, Tally Prime helps businesses save time, reduce errors, and improve their overall operational efficiency. With real-time inventory updates and detailed reports, Tally Prime ensures that businesses have the tools they need to manage their orders effectively and keep their customers satisfied.


Purchase and Sales Order Processing in Tally Prime

  1. #PurchaseOrderProcessing
  2. #SalesOrderProcessing
  3. #TallyPrimeOrders
  4. #OrderManagement
  5. #TallyPrimePurchaseOrder
  6. #SalesOrderInTallyPrime
  7. #InventoryControl
  8. #TallyPrimeOrderReports
  9. #AutomatedOrderProcessing
  10. #GSTOrderProcessing

Here is a list of topics you can include in your Tally Prime notes

You can structure your notes by expanding on these topics,in your Tally Prime notes providing detailed explanations, examples, and step-by-step guides for practical understanding.

1. Introduction to Tally Prime

  • What is Tally Prime?
  • Key Features of Tally Prime
  • Benefits of Tally Prime

2. Installation and Setup

  • System Requirements for Tally Prime
  • How to Install Tally Prime
  • Licensing and Activation
  • Configuring Tally Prime

3. Getting Started with Tally Prime

  • Navigating the Tally Prime Interface
  • Creating a Company in Tally Prime
  • Company Features and Configuration
  • Tally Vault (Security and Password Protection)

4. Master Creation

  • Creating Ledger Accounts
  • Creating Groups
  • Inventory Masters (Stock Groups, Stock Categories, Units of Measure)
  • Creating and Maintaining Cost Centers
  • Creating Budgets in Tally Prime

5. Vouchers in Tally Prime

  • Types of Vouchers (Receipt, Payment, Sales, Purchase, Journal, Contra)
  • How to Create and Edit Vouchers
  • Shortcut Keys for Vouchers
  • Post-Dated Vouchers

6. Accounting Features

  • Accounting with Tally Prime
  • Single Entry vs Double Entry Mode
  • Managing Receipts and Payments
  • Adjusting Entries and Journal Vouchers
  • Tally Prime for GST (Goods and Services Tax)

7. Inventory Management

  • Stock Ledger and Inventory Management
  • Stock Valuation Methods
  • Stock Transfers
  • Purchase and Sales Order Processing
  • Managing Reorder Levels

8. GST in Tally Prime

  • GST Setup and Configuration
  • Creating GST-Compliant Invoices
  • GST Reports (GSTR-1, GSTR-3B)
  • Reverse Charge Mechanism in Tally Prime
  • Handling Input Tax Credit

9. Payroll Management

  • Setting Up Payroll in Tally Prime
  • Creating Payroll Masters (Employees, Salary Details, Attendance)
  • Processing Payroll
  • Provident Fund (PF), ESI, and Gratuity in Tally Prime

10. Banking Features

  • Setting Up Bank Accounts
  • Cheque Printing in Tally Prime
  • Bank Reconciliation
  • Payment and Receipt Entries through Bank
  • E-Payments in Tally Prime

11. Generating Reports

  • Financial Reports (Profit & Loss Account, Balance Sheet)
  • GST Reports (GSTR-1, GSTR-3B, GSTR-9)
  • Inventory Reports
  • Cash Flow and Funds Flow Reports
  • Trial Balance and Day Book

12. Data Management

  • Backup and Restore in Tally Prime
  • Exporting Data (Excel, PDF)
  • Importing Data in Tally Prime
  • Tally Audit and Security Control
  • Data Synchronization and Remote Access

13. Tally Prime Shortcuts

  • Important Shortcut Keys in Tally Prime
  • Voucher Entry Shortcuts
  • Navigation Shortcuts
  • Report Generation Shortcuts

14. Tally Prime Add-ons and Features

  • Multi-Currency in Tally Prime
  • Tally Prime for E-Way Bill
  • Job Costing and Job Work
  • Multi-User and Remote Access in Tally Prime

15. Tally Prime Troubleshooting

  • Common Errors and Their Solutions
  • Troubleshooting Data Corruption
  • Reinstallation and Data Migration

16. Advanced Features of Tally Prime

  • Managing Multiple Companies
  • Advanced Inventory Features (Batch-wise Details, Expiry Date Management)
  • Cost Category and Cost Center Management
  • Interest Calculation
  • TDS (Tax Deducted at Source) in Tally Prime

in your Tally Prime notes

In Tally Prime, tags generally refer to the different types of categorization and identification features that help in organizing and tracking data. Below are some common types of “tags” or similar concepts in Tally Prime:

1. Cost Centers and Cost Categories

  • Purpose: To allocate and track incomes and expenses related to specific departments or projects.
  • Usage: Useful for tracking profitability across different divisions, departments, or projects.

2. Stock Categories and Stock Groups

  • Purpose: To categorize inventory items for better stock management.
  • Usage: Helps in reporting and analyzing inventory based on similar types or characteristics (e.g., by product type or category).

3. Batch and Expiry Date Tagging

  • Purpose: For businesses dealing with per Tally Prime Company Features,
  • How to Configure Company in Tally Prime,
  • Tally Prime Accounting Features,
  • Setting up Inventory in Tally Prime,
  • Tally Prime Payroll Features,
  • Tally Prime GST Setup,